Contents
Field Marshal 2 Release Notes
Field Marshal 3 Release Notes
Overview
Field Marshal helps you manage conditional ticket fields in Zendesk. It works with both the agent interface and the Help Center request forms, giving you full control over which fields (and even the submit button) are shown or hidden based on a user’s selections.
With Field Marshal, you can:
-
Build smarter forms that adapt as customers fill them out.
-
Show agents only the fields they need for a specific ticket.
-
Prevent mistakes when agents create tickets for others.
-
Simulate multiple ticket forms—useful if you’re not on Zendesk’s Enterprise plan.
Field Marshal supports:
-
The Zendesk Agent Workspace (formerly “Lotus”)
-
The new Zendesk Help Center
-
Lovestock & Leaf’s Feedback Widget
It doesn’t have its own interface. Instead, you configure everything through the Lovely app (the grey cloud icon in the sidebar). This guide will walk you through setup, configuration, and best practices.
1 Installing Field Marshal
There are two ways Field Marshal can be installed:
-
By us – If we’ve installed it for you, you can skip this section and go straight to 2. Configuring Field Marshal.
-
Using our foxycart installer – This will install two apps:
-
Field Marshal (agent) – Runs on the agent ticket form.
-
Lovely – Used to set up and manage Field Marshal configurations.
-
If you don’t need Field Marshal to run on the Help Center request form, you can also skip this section and go straight to the configuration steps.
Otherwise, follow the instructions below and contact us with:
-
Your Field Marshal license key
-
Your Zendesk subdomain (e.g.
yourcompany.zendesk.com)
We’ll send you a CloudMetro username and password, which you’ll need for setup.
1.1 Setting up Lovely
The Lovely app (the grey cloud icon in the Zendesk sidebar) is where you configure Field Marshal.
When you open Lovely, you’ll see two sections on the left:
-
ZENDESK APPS – apps running in the Zendesk agent interface
-
HELP CENTER APPS – apps running on the Help Center (end-user interface)
By default, Field Marshal will appear only under ZENDESK APPS, meaning it’s active for agents but not on your Help Center.
To enable Field Marshal for the Help Center:
-
In the Lovely app, select Lovely under Help Center Apps.
-
Enter the following setup details:
-
CloudmetroURL:
https://apps.cloudmetro.com/ -
Username: (provided by us)
-
Password: (provided by us)
-
If entered correctly, Field Marshal will appear under both Zendesk apps and Help Center apps. If not, contact us for help.
1.2 Installing Field Marshal (Help Center)
Once Field Marshal appears under Help Center Apps, click on it to define your configuration for the Help Center.
At the bottom of the configuration area, you’ll see a hash key (e.g., 0fcabe27756...). Copy this value.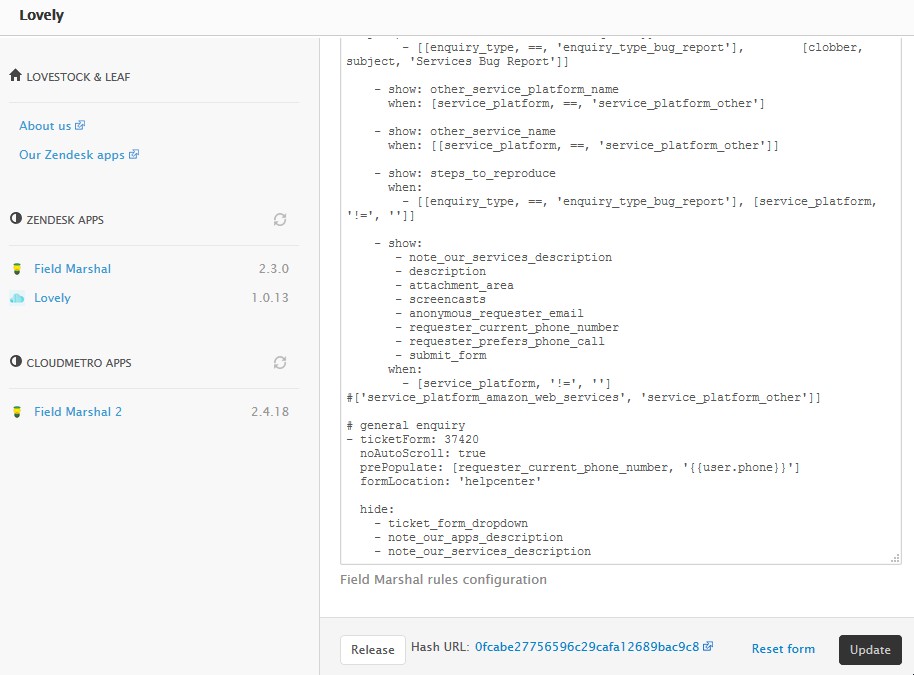
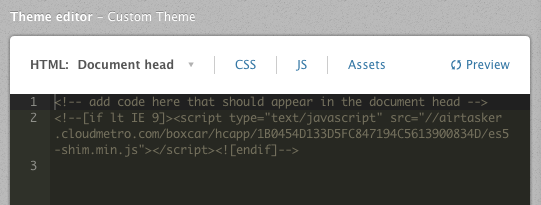
Now you’ll need to add this code snippet to your Help Center theme:
 <!-- [if lt IE 9]>
<script type="text/javascript" src="//cdnjs.cloudflare.com/ajax/libs/es5-shim/4.0.3/es5-shim.min.js"></script>
<script type="text/javascript" src="//cdnjs.cloudflare.com/ajax/libs/es5-shim/4.0.3/es5-sham.min.js"></script>
<![endif]-->
<script src="//cdn.cloudmetro.com/app-framework.js" type="text/javascript" data-lnl-hash="hash_key"></script>
Steps to add the code:
-
Log in as an admin in your Zendesk Help Center.
-
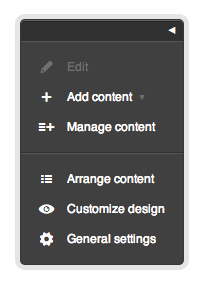
Click Customize design in the admin panel (bottom-right).
-
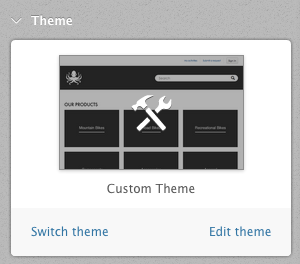
Click Edit theme in the top-left.
-
From the dropdown, select Document head.
-
If content already exists in the Document head, don’t delete it—just paste the CloudMetro code at the end.
-
Click Save and Publish the theme.
Once done, Field Marshal will be active on your Help Center request forms.
2 Configuring Field Marshal
All Field Marshal settings are managed through the Lovely app in Zendesk. You can set up rules separately for the agent interface and the Help Center.
2.1 Where to configure the Field Marshal app
To open the configuration area:
-
Click the Lovely (grey cloud) icon in your agent interface.
-
On the left, choose either:
-
Zendesk apps – for agent-side configuration, then find Field Marshal
-
Help Center apps – for Help Center configuration, then find Field Marshal HC
-
We recommend using YAML format to manage your Field Marshal configuration. It’s more readable and easier to maintain than JSON.
2.2 Test run
When setting up or updating Field Marshal on the Help Center side, you can test your changes before rolling them out to all users.
Here’s how:
-
Click the Update button to save your changes (this doesn’t publish them yet).
-
Open the request form using this URL format:
https://yourdomain.zendesk.com/hc/en-us/requests/new?cache=off
This lets you preview changes without affecting real users.
Once you're happy with the result, click Release to publish your config live. Note that releasing the config is irreversible and may take up to 30 minutes to reach all users.
2.3 Key concepts
Field Marshal works by applying rules to individual fields.
When writing rules, think about each field in terms of:
"This field should only appear when..."
Your configuration can be written in either YAML or JSON. This guide uses YAML examples.
Some key things to know:
-
Zendesk’s own validations still apply, even if a field is hidden.
-
If a required field is hidden, Field Marshal will auto-fill it with a fallback value (like
0ornot_applicable) so the form still submits. - For dropdowns, you’ll need to include a special “n/a” option with a tag in this format:
ll_not_applicable_<number>, likell_not_applicable_1so Field Marshal can fill it in. This option is hidden from view when the field is visible.
2.3.1 Field map
The field map lets you create simple, readable names (called aliases) for your Zendesk fields. You’ll use these aliases in your Field Marshal configuration instead of long IDs or complex selectors.
More information about jQuery selectors can be found at the following link:
http://api.jquery.com/category/selectors/
Each entry in your field map looks like this:
-
alias_name – the name you’ll use in your Field Marshal config (e.g.
product_issue) -
identifier – the actual ID or jQuery selector used to target the field in Zendesk
Some examples:
Tips:
-
Use snake_case for alias names (e.g.
return_reason) -
Avoid naming conflicts. Don’t use words that match plugin or filter names (like
show,hide, orticketForm) -
The alias is case-sensitive
-
Always declare all fields you plan to use in your config
-
Note that comments start with a hash (#)
You can find field IDs in two ways:
-
For custom fields: Go to Admin > Ticket fields and open the field to view its ID in the URL.
-
Or use the ID Viewer built into the Lovely app (recommended).
System field references
You can also use Field Marshal with system fields on the agent or Help Center side. These don’t have numeric IDs—use these predefined names instead:
Agent interface:
Help Center form:
2.3.2 Filter
Filters decide when a rule or plugin should apply—based on things like who the requester is, which form is being used, what group the assignee is in, and more.
You can place filters at different levels in your configuration, depending on how broadly you want them to apply:
You can use filters with a single value:
Or with multiple values:
Below is a quick summary of the most commonly used filters:
1. withOrganization
Shows or hides fields based on the requester's organization.
-
Use the organization ID (found in the URL when viewing the org in Zendesk).
-
Use
ll-noneto target users without an organization.
2. withRole
Targets the assignee's role (admin, agent, custom role, etc.).
-
end-user,agent,adminare standard roles. -
Custom roles (like Light Agent) have numeric IDs—find them under Admin > People > Roles.
3. withGroup
Targets based on the assignee’s group.
-
Use the group ID (found using the ID Viewer in Lovely).
-
ll-nonematches users without a group.
4. ticketForm
Applies rules based on the ticket form being used.
-
Only works if you're on Zendesk Enterprise.
-
Use the ID Viewer in Lovely to find the form ID.
5. formLocation
Specifies where the config applies:
Supported values:
-
agent– Agent interface -
helpCenter– Help Center request form -
feedbackWidget– Lovestock & Leaf feedback widget
This is usually set at a higher level, since Help Center and Agent forms usually have separate configs.
6. ticketStatus
Applies rules based on the current ticket status.
Available values:
-
new,open,pending,hold,solved,closed
7. url (Help Center only)
Targets specific request form URLs.
Comparison options:
-
contains,not contains -
==(exact match),!=(not equal)
Use this if you have multiple brands or forms hosted on different subdomains.
8. ticketTags (Agent only)
Targets based on tags on the ticket.
-
Use
containsornot contains.
9. fieldLength
Checks how many characters a field contains (useful for validation).
2.3.3 Plugin
Plugins let you control what happens to a field, like whether it’s shown, hidden, filled in automatically, made required, and more.
You can run plugins at different levels in your config. This gives you control over whether the plugin applies to a single field, a specific form, or everything.
Plugin levels:
Here’s how plugin levels work (from broadest to most specific):
| Plugin Level | What it affects |
|---|---|
globalPlugin |
All fields in all forms |
locationPlugin |
All fields in a specific location (e.g. agent or Help Center) |
formPlugin |
All fields in a specific ticket form |
fieldPlugin |
A specific field, always |
conditionalFieldPlugin |
A specific field, only when a condition is met |
Use
conditionalFieldPlugin when you want something to happen only if a rule is true.Plugin format
You’ll usually see plugins written in one of two ways:
If you’re applying the same plugin to multiple fields, use this format:
Examples of common plugins
Here are some of the most useful plugins you’ll likely use:
1. show / hide
Shows or hides a field based on conditions.
2. when
Used with show or hide to define the condition.
3. prePopulate
Fills a field with a value when the form loads (but only if it's empty).
4. clobber
Like prePopulate, but overwrites any existing value.
5. notEmpty
Makes a field required only when it's visible.
6. hideOptions / showOptions
Hide or show dropdown options by their tag.
7. placeHolder
Adds placeholder text inside a text box or text area (Help Center only).
8.keepValue
Keeps the value of a hidden field. Normally Field Marshal clears it.
9. fieldOrder
Controls the order of fields in the form (Help Center only).
List all fields if you use this. Unlisted fields may appear out of order.
10. groupFields
Groups fields under a heading (Help Center only).
11. subjectText
Sets the value of the subject field (Help Center or feedback widget only).
There are more plugins available, including advanced ones like:
-
noAutoScroll -
hideAutoScrollHelper -
disableAField -
validate -
paging -
urlPopulate
These are mostly for Help Center use only and can be found in the full plugin reference.
2.4 Field map
As mentioned previously, the field map is a way of declaring friendly names or aliases for fields, in the following format.
alias: identifier
“alias” is the name you want to give to the field when you are referring to it in the configuration, and “identifier” is the way of identifying the field. The alias and identifier cannot have spaces, but you may use an underscore in the alias (_). Please note that the alias is case-sensitive.
The “identifier” can only be a number (for custom fields) or a text string (for system fields on the Help Center request form).
All fields referred to in the conditional setup must be declared in the field map section.
An example field map is shown below. Note that comments start with a hash (#).
field1: 1234578
field2: 2234577
field3: 3423435
field4: 4654578
field5: 5645453
# Help Center system fields
sys_email: '#request_anonymous_requester_email'
sys_subject: '#request_subject'
sys_description: '#request_description'
sys_attachment: '#request-attachments-pool'
sys_forms: '#request_issue_type_select'
sys_submit_button: '#new_request input[name="commit"]'
Where
- field1 = Zendesk custom ticket field “custom_field_1234578”
- field2 = Zendesk custom ticket field “custom_field_2234577”
- field3 = Zendesk custom ticket field “custom_field_3423435”
- field4 = Zendesk custom ticket field “custom_field_4654578”
- field5 = Zendesk custom ticket field “custom_field_5645453”
- email = jQuery selector for Help Center form field “#email_address”
- sys_subject = jQuery selector for Help Center form field '#request_subject'
- sys_description = jQuery selector for Help Center form field '#request_description'
- sys_attachment = jQuery selector for Help Center form field '#request-attachments-pool'
- sys_forms = jQuery selector for Help Center form field '#request_issue_type_select'
- sys_submit_button = jQuery selector for Help Center form field '#new_request input[name="commit"]'
Custom ticket field IDs can be found by editing the ticket field via Admin>Ticket Fields, or by using the ID Viewer feature in the Cloudmetro Lovely app (the cloud icon) that was installed with your FM (recommended).
System fields don't have IDs as custom fields. However they can be referenced as follow (note that some are read-only):
# System fields on agent ticket form
sys_subject: 'subject'
sys_status: 'status'
sys_type: 'type'
sys_priority: 'priority'
sys_comment: 'comment'
sys_description: 'description'
sys_ticket_form_id: 'ticket_form_id'
sys_due_date: 'due_date'
sys_problem_ticket_id: 'problem'
sys_brand: 'brand'
sys_requester_id: 'requester.id'
sys_requester_email: 'requester.email'
sys_requester_name: 'requester.name'
sys_assignee_id: 'assignee.user.id'
sys_assignee_name: 'assignee.user.name'
sys_group_id: 'assignee.group.id'
sys_group_name: 'assignee.group.name'
sys_collaborator_id: 'collaborator.id'
sys_collaborator_email: 'collaborator.email'
sys_tags: 'tags'
sys_shared_with_id: 'sharedWith.id'
sys_shared_with_name: 'sharedWith.name'
sys_shared_with_partnername: 'sharedWith.partnerName'
sys_user_name: 'user.name'
sys_user_email: 'user.email'
sys_user_groups: 'user.groups'
sys_user_first_name: 'user.first_name'
sys_user_last_name: 'user.last_name'
sys_user_role: 'user.role'
sys_user_avatar_url: 'user.avatar_url'

# System fields on end user ticket form
sys_email: '#request_anonymous_requester_email'
sys_subject: '#request_subject'
sys_description: '#request_description'
sys_attachment: '#request-attachments-pool'
sys_forms: '#request_issue_type_select'
sys_submit_button: '#new_request input[name="commit"]'
2.5 Rules configuration
At the heart of Field Marshal is a set of rules that control when fields appear, disappear, or behave in special ways.
These rules live in the conditions: section of your configuration. Each rule has two parts:
-
What to do (e.g.
show,hide,prePopulate) -
When to do it (using the
whencondition)
Example
Here’s a simple configuration using common field behaviors:
What this does:
-
field2shows only if the dropdown fieldfield1has the option with tagfield1_tag1. -
field3shows iffield2is less than 30. -
field4andfield5both show iffield3is 50 or more.
Note that if you don’t apply any conditions to a field, it will always be shown by default.
More about when conditions
The when condition follows this format:
Supported comparisons include:
| Symbol | Description |
|---|---|
== |
equal to |
!= |
not equal to |
< |
less than |
<= |
less than or equal to |
> |
greater than |
>= |
greater than or equal to |
You can also use
== or != with lists of values:
Combining multiple conditions
You can use AND and OR logic in your rules.
AND condition (all conditions must be true)
This shows field1 only if both conditions are true.
OR condition (only one needs to be true)
This shows field1 if either value matches.
You can also mix AND/OR logic:
This means:
-
Show
field1iffield3 == value1 AND field4 != value2, or -
Show
field1iffield3 == value2
Note that only one OR condition will run at a time. If two OR conditions are true, only the first one found will apply.
Special use case: Attachment count
To set a condition based on the number of attachments uploaded:
Make sure the field map includes:
2.5.1 Filters
Filters help control when your Field Marshal rules or plugins should apply. Think of them as conditions that apply before your actual when logic kicks in.
They’re usually placed just before conditions: and can target things like the ticket form, the requester’s organization, the assignee’s role, and more.
Filter structure example
Here’s a breakdown of how filters are typically nested:
If you want to apply a filter to multiple values:
Available filters
1. formLocation
Defines which part of Zendesk the rule applies to.
Supported values:
-
agent -
helpCenter -
feedbackWidget
2. ticketForm
Targets one or more specific Zendesk ticket form IDs.
Only available for Zendesk Enterprise accounts.
3. withOrganization
Targets requesters who belong to a specific organization.
To find the org ID:
Go to Admin > People > Organizations, click an org, and look at the URL (e.g. organizations/24014300).
Use ll-none to target users without an org.
4. withRole
Targets tickets based on the assignee’s role.
Standard role values:
-
end-user -
agent -
admin
Custom roles (e.g. Light Agent) use numeric IDs.
5. withGroup
Filters by the assignee’s group.
Use the ID Viewer in the Lovely app to find the group ID.
Use ll-none to match unassigned users.
6. ticketStatus
Applies based on the ticket’s current status.
Available values:
-
new,open,pending,hold,solved,closed
7. url (Help Center only)
Applies rules based on the URL of the request form.
Other comparison options:
-
contains -
not contains -
==orequals -
!=ornot equals
Good for multi-brand Help Centers!
8. ticketTags (Agent only)
Targets tickets that have (or don’t have) specific tags.
You can also use 'not contains'.
9. fieldLength
Checks how many characters a field contains (e.g. useful for text validation).
Place your filters as close to the top of your config section as possible so they apply logically to all nested rules that follow.
2.5.1.1 withOrganization
The “withOrganization” filter allows you to define rules based on the requester’s organisation. Note the configuration setting uses the American spelling to be in-line with the Zendesk names. An example of how to use this filter is shown below.
withOrganization: 24014300
The organisation is taken from the organisation that is assigned to users within Zendesk. You can also use a special value of “ll-none” which means that the requester is not in an organisation. The ID of the organisation (or organisations) can be found in the browser address bar when you view the organisation via Admin>Manage>People
Click on the “oganizations” link under the search box.

Search and find the organisation you would like to find the ID of and click on the name. The ID of the organisation is found in the URL when you view the organisation in Zendesk. It is the number to the right of “organizations/”.

2.5.1.2 withRole
The “withRole” filter allows you to define rules based on the assignee’s role. An example of how to use this filter is shown below.
withRole: [agent, admin]
The roles are the preconfigured roles within Zendesk or custom roles. A light agent is considered a custom role and has a number as an identifier.
- end-user = End user
- agent = Agent
- admin = Administrator
- 123445 = Custom role or Light Agent (Enterprise only)
If you have an Enterprise subscription to Zendesk, the ID of the custom role (or roles) can be found via Admin<Manage>People.
Click on the “roles” link under the search box.

Search and find the role (or roles) you want to use, and hover over the edit button. The ID will be in the tooltip between “roles” and “edit”.

2.5.1.3 withGroup
The “withGroup” allows you to define rules based on the assignee’s group. An example of how to use the filter is shown below.
withGroup: 20166158
The group is taken from the group that is assigned to the agents within Zendesk. You can also use a special value of “ll-none” which means that the assignee is not in a group. The group ID can be found via the ID Viewer feature in the Cloudmetro app on the Field Marshal configuration page.
2.5.1.4 ticketForm
The “ticketForm” filter allows you to define rules based on the ticket form. This is only available to customers who have an Enterprise subscription to Zendesk. An example of how to use the filter is shown below.
ticketForm: 12345
The number is the ID of the ticket form. To ID of the ticket form can be found via the ID Viewer feature in the Cloudmetro app on the Field Marshal configuration page.
2.5.1.5 formLocation
The “formLocation” filter allows you to define rules based on the ticket form location. An example of how to use the filter is shown below.
formLocation: agent
The only supported values for this are:
- agent = The ticket form found in the new Zendesk Agent interface
- helpCenter = The new request form found in the new Zendesk Help Center
- feedbackWidget = The feedback widget
Please note that, since the Help Center and Agent configurations are usually not identical, and you have two separate configuration files for these, the formLocation filter is not often used.
2.5.1.6 ticketStatus
The “ticketStatus” filter allows you to define rules based on the current ticket status. An example of how to use this filter is shown below.
ticketStatus: [new, open]
The values are the following values:
- new
- open
- pending
- hold
- solved
- closed
2.5.1.7 url
Note: this filter is only available on Help Center location.
The “url” filter allows you to define rules based on the url for the form. An example of how to use the filter is shown below.
[url, ‘contains’, ‘zendesk.com’]
The general form of the filter is:
[url, comparison, value]
The only supported values for the comparison are:
- ‘contains’ means that the URL where the request form is being hosted contains the value
- ‘not contains’ means that the URL where the request form is being hosted does not contain the value
- ‘==’ or ‘equals’ means that the URL where the request form must equal the value. Note you must include the protocol (eg: https://www.zendesk.com). This can also be passed an array of values and it will match one of those values
- ‘!=’ or ‘not equals’ means that the URL where the request form must not equal the value. Note you must include the protocol (eg: https://www.zendesk.com).
2.5.1.8 ticketTags
The “ticketTags” filter allows you to define rules based on a tag on a ticket. An example of how to use the filter is shown below. This filter is only valid on the agent ticket page.
[ticketTags, ‘contains’, ‘field1_tag1’]
The general form of the filter is:
[ticketTags, comparison, value]
The only supported values for the comparison are:
‘contains’ means that the tag is present on the ticket
‘not contains’ means that the tag is not present on the ticket
2.5.1.9 fieldLength
The general form of the filter is:
[fieldLength, comparison, value]
2.5.2 Plugins
Plugins are actions you can apply to fields based on your rules. You can use them to:
-
Show or hide a field
-
Pre-fill values
-
Mark a field as required
-
Reorder fields
-
Control dropdown options
-
And much more
Plugins can be used on their own or within conditions, depending on when you want the action to run.
Examples of how to use a plugin are shown below.
[examplePlugin, field1, argument1, argument2]
The above is showing the use of the “examplePlugin” which is being applied to the field “field1” and passing two arguments to the plugin. This example is when the plugin is in the “conditionalFieldPlugin” location.
examplePlugin: [field1, argument1, argument2, argument3]
The above is showing the use of the “examplePlugin” which is being applied to the field “field1” and passing three arguments to the plugin. This example is when the plugin is not in the “conditionalFieldPlugin” location.
If you would like to run a plugin on more than one field in a location other than “conditionalFieldPlugin” location you can use the following form:
examplePlugin: [[field1, argument1, argument2, argument3], [field2, argument1, argument2, argument3]]
conditions:
  #globalPlugin
  - formLocation: agent
    #locationPlugin
    - ticketForm: ticket_form_1
      #formPlugin
      - show: field2
        #fieldPlugin
        when:
          - [[field1,'==',field1_tag1], <conditionalFieldPlugin>]
The higher up the hierarchy the filter is defined, the more fields it applies to. In this case the different plugins shown in bold will apply to the following fields:
- globalPlugin = All fields in all form locations for all ticket forms
- locationPlugin = All fields for all ticket forms in a specific ticket form location
- formPlugin = All fields in a specific ticket form for a specific ticket form location
- fieldPlugin = Only the field which the plugin is defined for
- conditionalFieldPlugin = Only the field when the condition is met shall the plugin run
As a guide, if you only need a plugin to be run once, then put it in the “globalPlugin”, “locationPlugin” or “formPlugin” locations.
The plugins which are run in the “conditionalFieldPlugin” location are run when the preceding condition is met.
Each of the available plugins and their use are explained below.
2.5.2.1 hideOptions
The “hideOptions” plugin allows you to hide certain options from a drop-down list.
[hideOptions, field1, field1_tag1, field1_tag2]
In the example above, the options with tags “field1_tag1” and “field1_tag2” will be hidden when field1 is shown. This example is when the plugin is in the “conditionalFieldPlugin” location.
hideOptions: [field1, field1_tag1, field1_tag2]
This above example is when the plugin is not in the “conditionalFieldPlugin” location.
2.5.2.2 showOptions
The “showOptions” plugin only shows the listed options in a drop-down list.
[showOptions, field1, field1_tag1, field1_tag2]
In the example above only the options with tags “field1_tag1” and “field1_tag2” will be shown when field1 is shown. This example is when the plugin is in the “conditionalFieldPlugin” location.
showOptions: [field1, field1_tag1, field1_tag2]
This above example is when the plugin is not in the “conditionalFieldPlugin” location.
2.5.2.3 prePopulate
The “prePopulate” plugin allows you to configure pre-populated information for a given field when the request form or ticket page is loaded. If the field already has a value, prePopulate will not change the value of the field.
[prePopulate, field1, “the value”]
The example above pre-populates the field “field1” with the value “the value”. This example is when the plugin is in the “conditionalFieldPlugin” location.
prePopulate: [field1, “the value”]
This above example is when the plugin is not in the “conditionalFieldPlugin” location.
2.5.2.4 notEmpty
The “notEmpty” plugin allows you to stop the form submission or ticket being updated if the given field is empty. This can be used to simulate a mandatory field which only shows up in some cases. An example of how to use this plugin is shown below.
[notEmpty, field1, field2]
The example above defines that the fields “field1” and “field2” cannot be empty when it is visible and the form is submitted or saved. This example is when the plugin is in the “conditionalFieldPlugin” location.
notEmpty: [field1, field2]
The example above defines that the fields “field1” and “field2” cannot be empty when it is visible and the form is submitted or saved. This example is when the plugin is not in the “conditionalFieldPlugin” location.
2.5.2.5 subjectText
The “subjectText” plugin can be used to pre-set the value of the subject field. This only applies for the formLocation of “helpCenter” and “feedbackWidget”.
[subjectText, “the text I want for the subject”]
The above example sets the subject field to have the value of “the text I want for the subject”. This example is when the plugin is in the “conditionalFieldPlugin” location.
subjectText: “the text I want for the subject”
The above example is when the plugin is not in the “conditionalFieldPlugin” location.
2.5.2.6 show
The “show” plugin is used to show a field. The “show” plugin can also use the “when” plugin to define the conditional rules for when the field is shown. If “when” is not provided, the field is always shown. The “conditionalFieldPlugin” location cannot be used for this plugin.
show: [field1, field2]
when: [field3, ‘==’, ‘field3_tag1’]
The above example shows both the fields “field1” and “field2” when the field “field3” has the value of “field3_tag1”.
2.5.2.7 hide
The “hide” plugin is used to show a field. The “hide” plugin can also use the “when” plugin to define the conditional rules for when the field is hidden. If “when” is not provided then the field is always hidden. The “conditionalFieldPlugin” location cannot be used for this plugin.
hide: [field1, field2]
when: [field3, ‘==’, ‘field3_tag1’]
The above example hides both the fields “field1” and “field2” when the field “field3” has the value of “field3_tag1”.
2.5.2.8 when
The “when” plugin provides the majority of the conditional fields logic. The “when” plugin can only be used as a part of “show” and “hide” plugins.
show: [field1, field2]
when: [field3, ‘==’, ‘field3_tag1’]
The above example shows both the fields “field1” and “field2” when the field “field3” has the value of “field3_tag1”.
The “when” plugin understands the concept of “and” and “or” conditions. Examples of these are shown below:
AND condition:
show: [field1]
when: [[field3, ‘==’, ‘field3_tag1’], [field2, ‘==’, ‘field2_tag1’]]
which can also be writtent as:
show: [field1]
when:
  - [[field3, ‘==’, ‘field3_tag1’], [field2, ‘==’, ‘field2_tag1’]]
The above example shows the field “field1” when the field “field3” has the value “field3_tag1” and the field “field2” has the values “field2_tag1”. Note the two levels of square brackets. For clarity the above is the “AND” condition.
OR condition:
show: [field1]
when: [[[field3, ‘==’, ‘field3_tag1’], [field3, ‘==’, ‘field3_tag2’]]]
which can also be written as:
show: [field1]
when:
	- [field3, ‘==’, ‘field3_tag1’]
	- [field3, ‘==’, ‘field3_tag2’]
The above example shows the field “field1” when the field “field3” has the value “field3_tag1” or the field “field3” has the values “field3_tag2”. Note the three levels of square brackets. For clarity the above is the “OR” condition.
In the 2nd format of this example above, the config lines preceded with a dash (-) make up OR statements. You can also combine one of the OR statements with an AND statement by adding the AND statement to the same OR line as follows.
show: [field1]
when:
	- [[field3, ‘==’, ‘field3_tag1’], [field4, ‘!=’, field4_tag1]]
	- [field3, ‘==’, ‘field3_tag2’]
In the above example field1 will show when field3 equals field3_tag1 AND field4 does not equal field4_tag1, OR it will show when field3 equals field3_tag2.
It is important to remember that only one OR condition must be able to be true at any time on the request form. If two OR conditions are found to be true, only one will be executed.
The general form of the “when” plugin when only using brackets is as follows. However, using dashes and new lines to separate OR conditions as above is recommended as it is more readable.
show: field
when: [[[clause1], [clause2]], [clause3], [[clause4], [clause5]]]
In pseudo-code you read this as:
if ( (clause1 or clause2) and clause3 and (clause4 or clause5) )
is satisfied then show field
This is a little bit mathematical, but this is also what gives Field Marshal the power and flexibility.
The clause has the general form of:
[field, comparison, value]
The comparison can have the following values:
- ‘==’ means that the field must equal the value. This can also be passed an array of values and it will match one of those values.
- ‘!=’ means that the field must not equal the value. This can also be passed an array of values and it will not match one of those values.
- ‘<’ means the the field must be less than the value
- ‘lower than’ means the the field must be less than the value
- ‘<=’ means the field must be less than or equal to the value
- ‘lower than or equal’ means the field must be less than or equal to the value
- ‘>’ means that the field must be greater than the value
- ‘higher than’ means that the field must be greater than the value
- ‘>=’ means that the field must be greater than or equal to the value
- ‘higher than or equal’ means that the field must be greater than or equal to the value
***Important***
For attachments count condition
e.g.
[sys_attachments, '>', 2]
the field mapping for the attachments must be set to #request-attachments-pool:
i.e.
sys_attachments: '#request-attachments-pool'
Otherwise the attachments count condition will not work.
2.5.2.9 placeHolder
The placeholder plugin allows you to configure placeholder text (form of help text telling the user what or how to populate into the field) which appears in a text box or textarea box in ticket forms. This plugin only works in the ticket form locations of helpCenter and feedbackWidget.
[placeHolder, field, “the text I want for the placeholder”]
The example above sets the placeholder text for the field “field”. This example is when the plugin is in the “conditionalFieldPlugin” location.
[placeHolder, field, “the text I want for the placeholder”]
The example above is when the plugin is not in the “conditionalFieldPlugin” location.
2.5.2.10 fieldOrder
The fieldOrder plugin allows you to configure the order of fields in a ticket form. This plugin is only available in the globalPlugin, locationPlugin and formPlugin locations. If you want to configure the order of the fields you should nominate all the fields in the form. If you do not list all the fields, the fields you have listed will appear at the top of the form, and the other fields will appear in an unpredictable order above or below the ordered fields.
fieldOrder: [field1, field2]
The example above defines the order of the fields for the form.
2.5.2.11 keepValue
The “keepValue” plugin allows you to retain the value of a hidden field. The default behaviour of Field Marshal is to clear the value of hidden fields. This plugin changes that behaviour. Note that this also affects checks on the fields. So if you have a condition based on the value of a field with a “keepValue” you cannot assume that the field will be empty.
keepValue: [field1, field2]
2.5.2.12 Clobber
The “clobber” plugin allows you to configure pre-populated information for a given field. If the field already has a value, clobber will change the value of the field. Use this with caution! An example of how to use this plugin is shown below.
[clobber, field1, “the value”]
The example above sets the field “field1” with the value “the value”. This example is when the plugin is in the “conditionalFieldPlugin” location.
clobber: [field1, “the value”]
The example above is when the plugin is not in the “conditionalFieldPlugin” location.
2.5.2.13 noAutoScroll
By default Field Marshal will automatically scroll your form to help you with entering the details. If you do not want this functionality then you can turn off the auto scroll function. This is only valid when the plugin is not in the “conditionalFieldPlugin” location, and it is only valid for form location of “helpcenter”.
noAutoScroll: true
The default value is “false”.
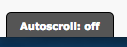
There is also a helper which is shown on the bottom left of the screen which allows an end user to disable the auto scroll while completing a form.
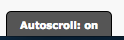
Clicking on the tab will set the “Autoscroll” to be off. Clicking it again will turn “Autoscroll” on.
2.5.2.14 hideAutoScrollHelper
You may want to have auto scroll on for your forms and not allow the user to turn off the functionality. To do this set the “hideAutoScrollHelper” to true. This is only available when the plugin is not in the “conditionalFieldPlugin” location, and it is only valid for form location of “helpcenter”.
hideAutoScrollHelper: true
This setting has no effect if you have set the noAutoScroll plugin value is set to “true”. The default value for this plugin is “false”.
2.5.2.15 groupFields
Field Marshal can group fields together under a title for better presentation. This configuration option is only available for the form location of “helpcenter”. An example of how to use this configuration options is shown below.
groupFields: [“the title for the group of fields”, style_class, field1, field2, field3]
OR
groupFields:
	- [“the title for the 1st group of fields”, ‘’, field1, field2]
	- [“the title for the 2nd group of fields”, ‘’, field3, field4]
The first example above groups fields “field1”, “field2”, “field3” into a group and gives it the title “the title for the group of fields”. This is available when the plugin is not in the “conditionalFieldPlugin” location. The 2nd example has two groups.
The first parameter is the title of the group, and this is optional. If you do not want to specify a title, then put an empty string (‘’). The second parameter is the CSS style class to use for the group heading, this is usually left as an empty string (‘’) as per the second example.
2.5.2.16 fakeRequired
Form location: helpcenter only
2.5.2.17 hideEmptyFieldsOnExistingTicketPage
Form location: helpcenter only
2.5.2.18 label
Form location: helpcenter only
2.5.2.19 optionLabel
Form location: helpcenter only
2.5.2.20 paging
Form location: helpcenter only
2.5.2.21 prePopulateFromField
Form location: helpcenter only
2.5.2.22 preventEnterSubmit
Form location: helpcenter only
2.5.2.23 urlPopulate
Form location: helpcenter only
2.5.2.24 validate
Form location: helpcenter only
2.5.2.25 validation
Form location: helpcenter only
2.5.2.26 disableAField
Form location: helpcenter only
2.5.2.27 disableAllFields
Form location: helpcenter only
2.6 Recommended configuration practices
Field Marshal gives you a lot of power, but it's best to start simple. Only use the features you actually need—this keeps your configuration easier to manage and troubleshoot.
Below is a sample configuration using several common patterns:
mainQuery: 21795970
accountEnquiry: 21695484
deliveryEnquiry: 21853740
orderEnquiry: 21853730
productEnquiry: 21695454
returnEnquiry: 21695444
technicalEnquiry: 21852534
orderNumber: 21843994
userBrowser: 21987220
userOS: 21987510
orderDuration: 21853930
productCode: 21830244

#System fields for HC
email: '#request_anonymous_requester_email'
subject-hc: '#request_subject'
description-hc: '#request_description'
attachment_area-hc: '#request-attachments-pool'
submitForm-hc: '#new_request input[name="commit"]'
sys_forms: '#request_issue_type_select'

conditions:
        - show: orderEnquiry
          when:
            - [mainQuery, '==', orders]
        - show: deliveryEnquiry
          when:
            - [mainQuery, '==', delivery]

        - show: accountEnquiry
          when:
            - [mainQuery, '==', my_account]

        - show: productEnquiry
          when:
            - [mainQuery, '==', product_information]

        - show: returnEnquiry
          when:
            - [mainQuery, '==', returns]

        - show: technicalEnquiry
          when:
            - [mainQuery, '==', technical_issues_site_assistance]

        - show: userOS
          when:
            - [[technicalEnquiry, '!=', ""], [technicalEnquiry, '!=', undefined]]
        - show: userBrowser
          when:
            - [[userOS, '!=', ""], [userOS, '!=', undefined]]

        - show: accountOtherIssue
          when:
            - [accountEnquiry, '==', account_other_issue]

        - show: orderDuration
          when:
            - [deliveryEnquiry, '==', delivery_not_arrived]


        - show: orderNumber
          when:
            - [returnEnquiry, '==', return_how_to]
            - [returnEnquiry, '==', return_faulty]
            - [returnEnquiry, '==', i_have_not_received_my_refund]
            - [deliveryEnquiry, '==', delivery_tracking]
            - [orderDuration, '==', order_morethan_3days]

        - show: productCode
          when:
            - [orderEnquiry, '==', order_out_of_stock]

        - show: [subject-hc, description-hc, attachment_area-hc, submitForm-hc]
          when:
            - [returnEnquiry, '==', return_how_to]
            - [returnEnquiry, '==', return_faulty]
            - [returnEnquiry, '==', i_have_not_received_my_refund]
            - [deliveryEnquiry, '==', delivery_tracking]
            - [[userBrowser, '!=', ''], [userBrowser, '!=', undefined]]
            - [accountEnquiry, '!=', '']
            - [mainQuery, '==', 'other']
            - [orderDuration, '==', order_morethan_3days]
            - [orderEnquiry, '==', order_cancel]
            - [orderEnquiry, '==', order_out_of_stock]

This example is taken from our Lovely Apps Zendesk instance.
Quick reference: Plugin & location cheat sheet
| Plugin Name | Description | Help Center | Agent |
|---|---|---|---|
show / hide
|
Show/hide fields | ✅ | ✅ |
when |
Define rule condition | ✅ | ✅ |
prePopulate |
Pre-fill a field if empty | ✅ | ✅ |
clobber |
Overwrite value in a field | ✅ | ✅ |
notEmpty |
Make field required if visible | ✅ | ✅ |
hideOptions |
Hide specific dropdown options | ✅ | ✅ |
showOptions |
Show only selected dropdown options | ✅ | ✅ |
placeHolder |
Adds hint text to text fields | ✅ | 🚫 |
keepValue |
Keep hidden field's value | ✅ | ✅ |
fieldOrder |
Controls order of fields | ✅ | 🚫 |
groupFields |
Groups fields under section titles | ✅ | 🚫 |
subjectText |
Sets subject text | ✅ | 🚫 |
noAutoScroll |
Disables scroll to visible field | ✅ | 🚫 |
disableAField |
Disables specific fields | ✅ | 🚫 |
disableAllFields |
Disables all fields | ✅ | 🚫 |
validation |
Adds custom validation rules | ✅ | 🚫 |
✅ = Supported
🚫 = Not available for that interface
2.6.1 Conditional (nested) sub options
If your dropdown field has nested options (like categories and subcategories), and you want to control visibility of those sub-options, you need to include both:
-
The parent label (exactly as it appears in the dropdown), and
-
The specific option tags you want to include or exclude
Example dropdown:
Imagine a custom dropdown field called dept with the following options:
-
HR→ tag:hr -
Finance::Purchasing→ tag:fin_purch -
Finance::Accounts→ tag:fin_acc
To only show HR and Finance > Accounts, your config would look like:
Why include Finance?
Even though you don’t need to show Finance::Purchasing, you must include the parent label Finance so that Finance::Accounts has a category to sit under.
If your dropdown goes more than two levels deep, repeat this approach: include all parent levels in the order they appear in the label.
2.6.2 Running plugins without showing or hiding a field
Sometimes you just want to run a plugin based on a condition—without revealing or hiding any fields. You can absolutely do that.
Here’s how:
Example
Let’s say you want to automatically pre-fill a value in field2 when field1 has a certain tag:
Another example: clobber only
This is useful for:
-
Overriding values
-
Adding placeholder text
-
Pre-filling details
-
Controlling dropdown options
-
Validating form input
All without needing to show or hide any fields at all.
2.7 Field aliases
Before you can reference a field in your Field Marshal rules, you need to map it in the configuration file using an alias. This is done in the field map section.
Think of aliases as short, friendly names that point to specific Zendesk fields—custom or system.
How aliases work
Each alias maps to either:
-
A custom field ID (for agent-side forms), or
-
A jQuery selector (for Help Center forms)
Example:
Then, use those aliases throughout your configuration, like:
Where to find custom field IDs
To locate your custom field ID:
-
Go to Admin > Ticket fields in Zendesk
-
Click into a field to edit it
-
The URL will contain something like
custom_field/12345678— that’s your ID
Or, use the ID Viewer in the Lovely app (cloud icon on the left sidebar) to easily view IDs for all fields.
System field aliases
These don't use numeric IDs but can still be referenced using standard keywords.
Agent interface (use plain names):
Help Center (use jQuery selectors):
In Help Center the field aliases are:
- sys_email: '#request_anonymous_requester_email'
- sys_subject: '#request_subject'
- sys_description: '#request_description'
- sys_attachment: '#request-attachments-pool'
- sys_screencasts: '#request-screencasts-pool'
- sys_submit_button: '#new_request input[name="commit"]'
- sys_forms: ‘#request_issue_type_select’
2.7.1 Naming of fields
To avoid issues, never give a field an alias that matches the name of a plugin or filter—like ticketForm, show, or hide. This can break your config.
Use snake_case (lowercase letters with underscores) for your aliases. This keeps things readable and prevents conflicts.
Good example:
Avoid:
You can learn more about snake_case naming here:
Wikipedia: Snake case
2.8 Configuration examples
Below are two real life examples showing the use of the most common configuration settings.
Note, if you don’t have any ticket forms, “conditions:” will usually be on your first line in your configuration file, as follows.
conditions:
  - hide: [origin]
  - keepValue: [origin]
  - show: publication
    when:
      - [ticketSource, '!=', '']
HELP CENTER EXAMPLE
- ticketForm: 55225 # Help
  keepValue: [sys_subject, sys_forms]
  hide: [sys_subject]
  prePopulate:
    - [sys_subject, 'Help me']
    - [your_name, '{{user.name}}']
  hideOptions: [contact_method, do_not_contact]
  showOptions: [sub_category, sub_cat_accounts, sub_cat_quotes, sub_cat_claims, sub_cat_general]
  fieldOrder: [sys_forms, your_name, sys_email, contact_method, phone_number, best_day_to_call, best_time_to_call, email_address, mobile_number, sub_category, sys_description]
  groupFields:
    - ['Name and contact details', '', your_name, sys_email, contact_method, phone_number, best_day_to_call, best_time_to_call, email_address, mobile_number]
    - ['Request details', '', sub_category, sys_description, sys_attachment]
  conditions:
    - show: sys_email
      when:
        - ['user.role', '==', 'anonymous']
    - show: [best_day_to_call, phone_number]
      when:
        - [[contact_method, '==', contact_by_phone], [placeHolder, phone_number, 'What number would you like us to call?']]
    - show: best_time_to_call
      when:
        - [best_day_to_call, '!=', '']
    - show: email_address
      when:
        - [['user.role', '!=', 'anonymous'], [contact_method, '==', contact_by_email], [clobber, email_address, '{{user.email}}']]
    - show: mobile_number
      when:
        - [contact_method, '==', contact_by_sms]
    - show: sub_category
      when:
        - [best_time_to_call, '!=', '']
        - [contact_method, '==', [contact_by_email, contact_by_sms]]
    - show: [sys_description, sys_attachment, sys_submit_button]
      when:
        - [[sub_category, '!=', ''], [placeHolder, sys_description, 'What are the details, and how can we help?']]
- ticketForm: 55235 # Complaints
  keepValue: [sys_subject, sys_forms]
  hide: [sys_subject]
  prePopulate:
    - [sys_subject, 'Complaint/Feedback']
    - [your_name, '{{user.name}}']
  hideOptions: [contact_method, contact_by_sms]
  showOptions: [sub_category, sub_cat_accounts, sub_cat_quotes, sub_cat_claims, sub_cat_general]
  fieldOrder: [sys_forms, your_name, sys_email, email_address, phone_number, alternative_number, contact_method, best_day_to_call, best_time_to_call, sub_category, sys_description]
  groupFields:
    - ['Name and contact details', '', your_name, sys_email, email_address, contact_method, phone_number, alternative_number, best_day_to_call, best_time_to_call]
    - ['Request details', '', sub_category, sys_description, sys_attachment]
  conditions:
    - show: sys_email
      when:
        - ['user.role', '==', 'anonymous']
    - show: email_address
      when:
        - [['user.role', '!=', 'anonymous'], [clobber, email_address, '{{user.email}}']]
    - show: [best_day_to_call]
      when:
        - [[contact_method, '==', contact_by_phone], [placeHolder, phone_number, 'What number would you like us to call?']]
    - show: best_time_to_call
      when:
        - [best_day_to_call, '!=', '']
    - show: sub_category
      when:
        - [best_time_to_call, '!=', '']
        - [contact_method, '==', [contact_by_email, do_not_contact]]
    - show: [sys_description, sys_attachment, sys_submit_button]
      when:
        - [[sub_category, '!=', ''], [placeHolder, sys_description, 'Please explain the reason for your complaint, and how you would want to see this resolved.']]
AGENT EXAMPLE
- ticketForm: 55225 # Help
  keepValue: [event_timestamp_gmt, category, event]
  hide: [event_timestamp_gmt]
  notEmpty: [ticket_source]
  clobber:
    - [category, cat_enquiry]
    - [event, event_enquiry_submitted]
  conditions:
    - show: [send_sms, display_on_my_activities, category, sub_category, related_risk_description, your_name, contact_method]
      when:
        - [ticket_source, '!=', '']
    - when: [ticket_source, '==', '']
      showOptions: [ticket_source, source_cso, source_phone]
    - when: [[category, '!=', ''], [category, '==', '']]
      showOptions: [category, cat_enquiry]
    - when: [[sub_category, '!=', ''], [sub_category,'==', '']]
      showOptions: [sub_category, sub_cat_accounts, sub_cat_quotes, sub_cat_claims, sub_cat_general, sub_cat_sales_assistance, sub_cat_claims_supplier]
    - show: event
      when:
        - [[sub_category, '!=', ''], [showOptions, event, event_enquiry_submitted]]
    - show: [best_day_to_call, best_time_to_call, phone_number]
      when:
        - [contact_method, '==', contact_by_phone]
    - show: email_address
      when:
        - [contact_method, '==', contact_by_email]
    - show: mobile_number
      when:
        - [contact_method, '==', contact_by_sms]
    - show: [chat_start, chat_end, chat_duration]
      when:
        - [ticket_source, '==', source_chat]
- ticketForm: 55235 # Complaint
  keepValue: [event_timestamp_gmt, category, event]
  hide: [event_timestamp_gmt]
  notEmpty: [ticket_source]
  hideOptions: [contact_method, contact_by_sms]
  clobber:
    - [category, cat_complaint]
    - [event, event_complaint_submitted]
  conditions:
    - show: [send_sms, display_on_my_activities, category, sub_category, related_risk_description, related_risk_description, your_name, contact_method, phone_number, email_address, alternative_number, workflow_status]
      when:
        - [ticket_source, '!=', '']
    - when: [ticket_source, '==', '']
      showOptions: [ticket_source, source_cso, source_phone]
    - when: [[category, '!=', ''], [category, '==', '']]
      showOptions: [category, cat_complaint]

    - when: [[sub_category, '!=', ''], [sub_category, '==', '']]
      showOptions: [sub_category, sub_cat_accounts, sub_cat_quotes, sub_cat_claims, sub_cat_general, sub_cat_sales_assistance, sub_cat_claims_supplier]
    - show: event
      when:
        - [[sub_category, '!=', ''], [showOptions, event, event_complaint_submitted]]
    - when: [[workflow_status, '!=', ''], [workflow_status, '==', '']]
      showOptions: [workflow_status, workflow_complaint_in_progress, workflow_complaint_resolved, workflow_complaint_commitee, workflow_complaint_unresolved]
    - show: [best_day_to_call, best_time_to_call]
      when:
        - [contact_method, '==', contact_by_phone]
    - show: [chat_start, chat_end, chat_duration]
      when:
        - [ticket_source, '==', source_chat]
Troubleshooting & tips
Field Marshal is flexible, but small mistakes in the configuration can cause things not to work as expected. Here are a few things to double-check if something looks off.
Common issues & how to fix them:
| Issue | What to check |
|---|---|
| Nothing happens when a form is loaded | Confirm the config is saved and deployed. For Help Center: test with ?cache=off
|
| A field isn’t showing | Check that the alias is declared correctly in the field map and matches the field ID or selector |
| Field shows even when conditions say it shouldn’t | Check if there are multiple rules targeting the same field—conflicts can cancel each other out |
| Dropdown options not hiding | Make sure you’ve used correct option tags, not labels |
| Hidden required fields block form submission | Add the special “ll_not_applicable_x” option to your dropdown and include logic to auto-fill it |
| Field order is wrong | If using fieldOrder, list all fields in the desired order—unlisted ones appear unpredictably |
| Plugins not working | Ensure you’re not using a plugin name as a field alias—it will break the logic |
4. FAQs
Do I need both the agent and Help Center versions of Field Marshal installed?
Only if you're managing conditional logic on both agent tickets and customer-facing forms. You can install one or both depending on your needs.
What’s the difference between prePopulate and clobber?prePopulate only fills a field if it's empty. clobber overwrites whatever’s there, even if the field already has a value.
How do I test changes without affecting all users?
Use the ?cache=off trick in the Help Center URL to test before clicking “Release.”
Can I back up or version my Field Marshal config?
Yes, we strongly recommend copying your YAML or JSON config to a separate document for safekeeping. You can also store backups in Lovely using templates.
Where do I find field and form IDs?
Use the ID Viewer in the Lovely app (cloud icon) to grab custom field IDs, form IDs, and other internal references.
I would love to get a reference guide showing all of the built-in fields we can act on with this app. I already discovered "tags" and "organization" but I'm sure there are others. Could you publish that list as an article here in your help center?
Hi Justin,
At the bottom of section 2.4 (https://support.lovestockleaf.com/hc/en-us/articles/207652283#toc2_4), there is a list of system fields that can be used. Is that what you are looking for?
That list is now fully updated but I don't see organization in it. If you have an example of how organization works in your config, please let me know and I can find out more info for you regarding this. Thank you
Hi,
Would I be able to use DisableAField to prevent agents from changing a field, but still allow macros to update it?
Hi Cj,
This is up to Zendesk to control disabled fields & macros rather than Field Marshal app.
However, we just made a test and can confirm that we can set disabled fields via macros (and also confirmed that it works with disableAField plugin of Field Marshal)
Kind regards