Contents
Choose what you want to add
If you already know what you want agents to see, use this table to jump straight to the right object type.
| Object | Best for | Go to |
|---|---|---|
| Logged notes | Notes that record who added each entry and when | Logged notes |
| Pinned comments | Keeping important ticket comments or side conversations visible | Pinned comments |
| Zendesk fields | Showing or editing ticket, user, or organization field values | Zendesk fields |
| Notices | Alerts, guidance, acknowledgements, and conditional messages | Notices |
| Buttons | Running macros or opening useful links | Buttons |
Overview
Sticky Notes lets agents view and update notes, fields, notices, and buttons while working in Zendesk. Add them to ticket, user, or organization locations so information is easy to find.
Admins control where each object appears, who can use it, when it is shown, and whether agents can edit it. Use Quick Start for a basic setup, or jump to a specific object section for detailed configuration.
Before you start: Sticky Notes can make Zendesk data easier to access, but it does not replace Zendesk's underlying permissions. An agent still needs the required Zendesk permission to edit ticket, user, or organization data.
Key features
Logged notes
Create notes that show when they were added and who added them, with control over who can edit them later. Read more here.
Pinned comments
Pin important comments so they stay visible and don’t get buried in long ticket threads. Read more here.
Smart notices
Create custom notices using placeholders and Liquid to pull in values from ticket, user, and organization fields. These notices can adapt based on conditions and can be shown as popup modals so agents see them as soon as a ticket opens. Read more here.
Highly visible notes
View and edit important notes directly from the sidebar, including related user and organization fields. Read more here.
Action buttons
Use buttons to run Zendesk macros or open links in a new tab. Read more here.
Clone objects
Duplicate and move objects across locations. Read more here.
Rich text editor
Write and format notes using a built-in rich text editor.
Field descriptions
Add guidance above or below a field, with optional tooltips that appear when agents hover over the info icon.
Zendesk field support
Sticky Notes supports all Zendesk field types. Fields are automatically disabled if they’re already in use, helping avoid duplicates, and the multi-column layout makes it easier to view information at a glance.
Data portability
Store notes in Zendesk custom fields so they can be used by other apps, analyzed in Zendesk Explore, and exported when needed.
Flexible field management
Use multiple fields for different types of notes, with access and setup managed by Zendesk admins.
Expandable window
Open a note in a larger dialog to view and edit it more comfortably.
Advanced styling
Style labels and fields so important information stands out, or keep them subtle when needed.
Multi-installs
Sticky Notes can be installed multiple times in the same Zendesk instance, allowing you to configure it differently for specific agent groups or place it in multiple locations on your ticket layouts. Read more here.
Side conversations in pinned comments
Pin side conversations, such as email threads, Slack messages, Microsoft Teams chats, or linked tickets, so they stay visible alongside your pinned comments.
Use the filters to show only the types of comments you want to see. Read more about filtering comments here.
Pin an entire side conversation to keep the full discussion easy to access, or pin individual messages to highlight specific details. Read more about pinning side conversations here.
Ticket editor location
Open Sticky Notes from the ticket editor. Read more here.
Multi-column option
You can control how notes and other objects are laid out within the same app instance by adjusting the panel width and the Max columns width setting for each object.
The Max columns width setting controls how wide an object is allowed to be. The actual width may vary depending on the object’s content and the available space.
- Auto: The object adjusts its width automatically based on the available space.
- 1–4 columns: The object can span up to the selected number of columns, but may use fewer if there isn’t enough content or space.
- Full width: The object stretches across all available columns.
These settings let you place objects side by side instead of stacking them, making it easier to organize notes within a single app installation.

Installation and access
Know which setting you are changing:
- Installation settings control which Zendesk roles and groups can access this Sticky Notes installation.
- Global settings control behavior across the installation.
- Location settings control where Sticky Notes appears.
- Object settings control how an individual note, field, notice, or button behaves.
Install Sticky Notes more than once if different teams need separate settings or layouts.
Initial install
You can install Sticky Notes directly from the Zendesk Marketplace.
Start your free trial
- Go to the Sticky Notes listing on the Zendesk Marketplace.
- Click Free Trial and confirm the installation.
Configure the app in Zendesk
- After starting the trial, navigate to Zendesk Admin Center > Apps > Zendesk support apps.
- Enter a Title for the installation (e.g., Sticky Notes - Support Team).
- (Optional) Configure role and group restrictions to control access to this Sticky Notes instance.
- Click Update to save the setup.
Multi-installs
Sticky Notes supports multiple installations in one Zendesk instance, allowing you to customize different setups for specific teams, workflows, or sections within Zendesk.
-
Custom layouts – Place different Sticky Notes in various ticket sections to separate key information.
-
Role & group-based access – Restrict each Sticky Notes instance to specific roles or teams for better organization.
Each additional instance requires a separate installation through the Zendesk Marketplace.
- Go to the Zendesk Marketplace Sticky Notes listing.
- Click Free Trial again to start a new installation.
- When prompted, enter a unique title (e.g., Sticky Notes - Billing Team).
- Do not use the exact same name as an existing installation. Give each one a name you can recognize.
- (Optional) Configure role and group restrictions to control which teams can access this instance.
- Click Install to complete the setup.
Each installation has its own settings. Changes to one do not affect the others.
Installation settings
After installation, you can update key settings such as the title, role restrictions, and group restrictions.
App title
You can rename an installed instance to reflect its purpose.
- Go to Zendesk Admin Center > Apps > Zendesk Support apps.
- Locate the Sticky Notes instance you want to rename and click the Settings (⚙️) icon.
- Select Change settings for the Sticky Notes install.
- Update the Title field (e.g., Sticky Notes - VIP Support).
-
Click Update to save changes.
Role restrictions
Limit Sticky Notes access based on user roles:
- Click the Settings (⚙️) icon and select Change settings for the Sticky Notes install.
- Enable Role restrictions and select the roles allowed to use this instance.
-
Click Update to apply changes.
Group restrictions
Restrict access by agent groups:
- Click the Settings (⚙️) icon and select Change settings for the Sticky Notes install.
- Enable Group restrictions and choose the groups that should see this Sticky Notes instance.
-
Click Update to save.
Quick Start
- Open Sticky Notes and select App settings.
- Choose the location where agents will use it.
- Click Add and choose an object type.
- Select or create a Zendesk field if that object requires one.
- Configure the object and click Save.
- Reload Zendesk and test with the intended agent role.
Start with a Zendesk field, Logged notes, or Pinned comments. The illustrated example below shows a Zendesk field.
The example below creates a Zendesk field in the existing ticket sidebar. The same pattern can be reused for other locations and object types.
1. Open Sticky Notes from the Zendesk sidebar.
2. Click App settings.
3. Use the Quick Start feature to add custom note fields to tickets. Select Existing ticket sidebar when prompted.
4. Click Add.
5. Choose Zendesk field as object type.
6. Select Ticket field and Automatically create new field.
7. Save your settings to add the object to the Existing ticket sidebar location.
8. Reload Zendesk (press F5 or Ctrl + R ), then open a ticket.
You can now add notes to the ticket using this field. On Mac, press Command + R.
Need a visual walkthrough?
This video shows how to create fields, add them to ticket forms, and connect them to Sticky Notes.
We’ll show you how to set up both Pinned comments and Logged notes .
If you need help, email support@lovestockleaf.com .
Global settings
Global settings apply to this Sticky Notes installation.
1. Click More options on Sticky Notes.
2. Select App settings.
3. Click Global settings.
4. Update the settings you need.
Here's an overview of each setting available:
Lock empty objects label
Control whether agents can switch between icon and label views for empty object labels. By default, agents can choose how these labels appear, but this setting locks the display to keep it consistent for everyone.
Enable role restrictions?
Turn this on to enforce role-based access, so users only see and access features allowed by their Zendesk role.
Convert ticket IDs to link
When enabled, ticket numbers written with a # (for example, #12345) become clickable links that open the referenced ticket.
User field role override
This experimental option allows agents to edit user fields even if their Zendesk role normally doesn’t allow it. It’s intended for testing or temporary scenarios where more flexible permissions are needed.
Organization field role override
Like the user field override, this experimental setting allows agents to edit organization fields even if their Zendesk role normally restricts it. Use with caution.
Submitting ticket with field(s) in edit mode
Controls what happens if an agent submits a ticket while a field, such as a multi-line field, is still being edited. By default, the ticket submission is blocked and the agent is notified to finish editing first.
Location settings
Choose where Sticky Notes appears and how objects are arranged in each location.
Set display location
Sticky Notes can appear in several places in Zendesk, including the ticket sidebar, ticket editor, user profile, and organization profile. Select the locations you want to use, then configure each one as needed.
1. Click More options on Sticky Notes.
2. Select App settings.
3. Select the display location by choosing from five options: New ticket sidebar, Existing ticket sidebar, Ticket editor, User sidebar, or Organization sidebar.
New ticket sidebar location
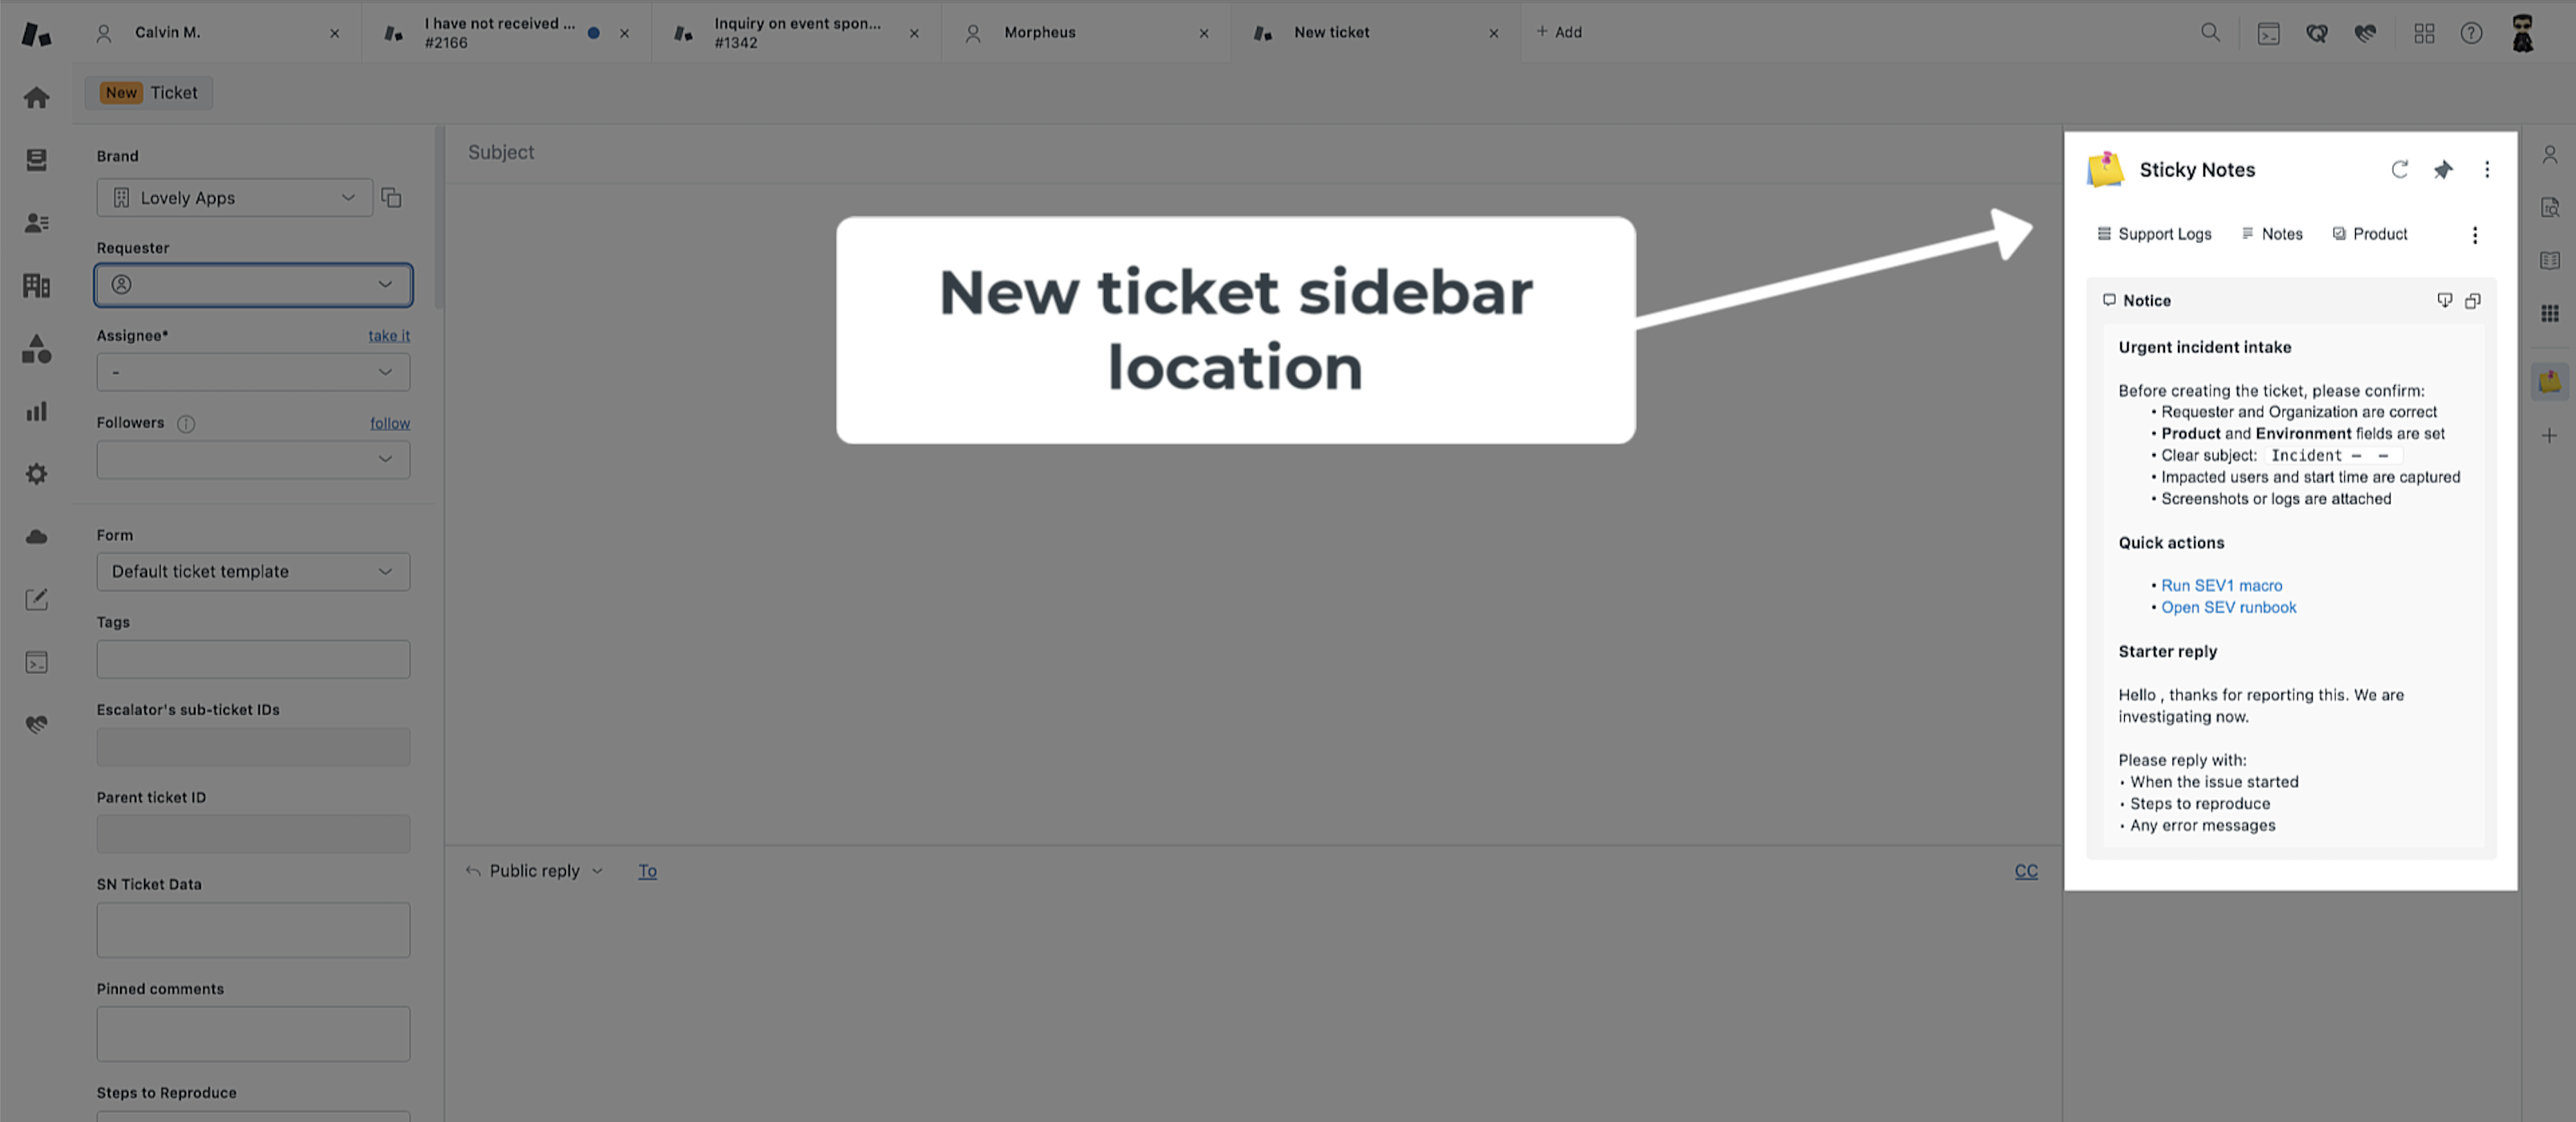
Show fields and notices while an agent creates a ticket. Use this location for information agents need before submitting it.
If the same data should also appear on the ticket later, use existing fields so they can be reused in the Ticket sidebar. Pinned comments aren’t available in this location because the ticket doesn’t have any comments yet.
Notice modals can appear before a new ticket is submitted. When an agent selects a requester, Sticky Notes retrieves the requester’s tags and their organization’s tags, then evaluates any matching notice conditions. Read more about how to set this up here.
The new ticket sidebar offers two modal timing options:
- Every time a new ticket is composed
- Show once per agent (per notice)
When ticket is first viewed is not available because the ticket does not yet exist. Notice acknowledgements can be added to the comment box, but cannot be posted directly to the ticket until it has been created.
Ticket sidebar location
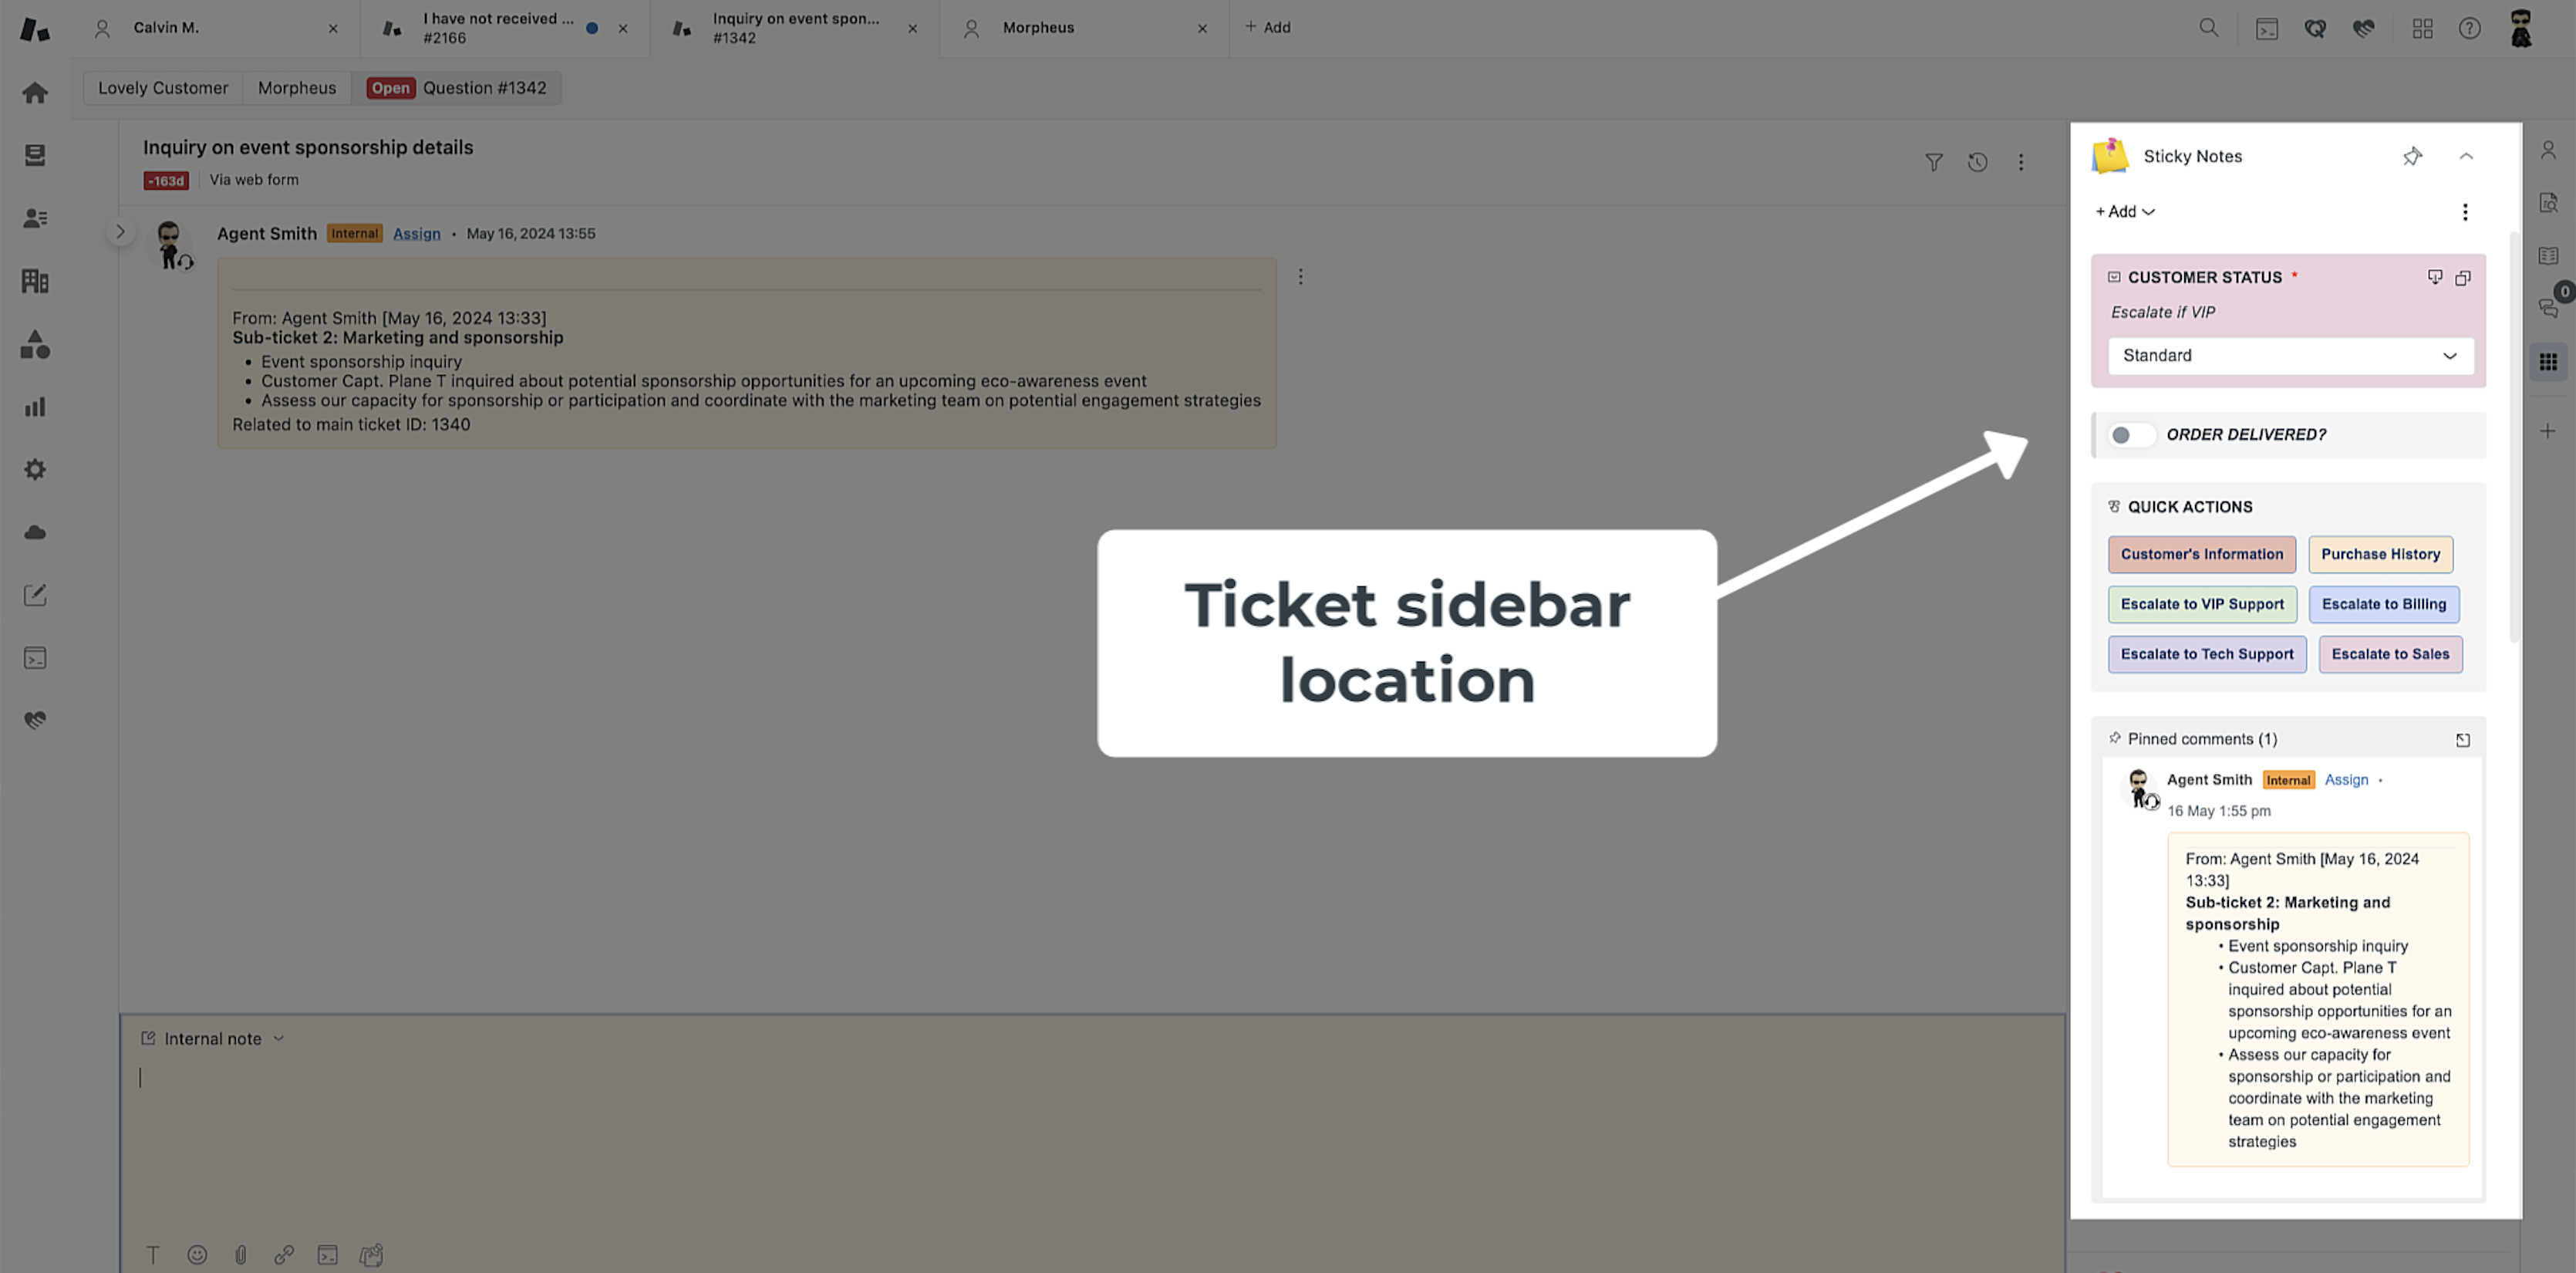
Show notes, fields, buttons, and pinned comments while agents work on existing tickets.
User sidebar location
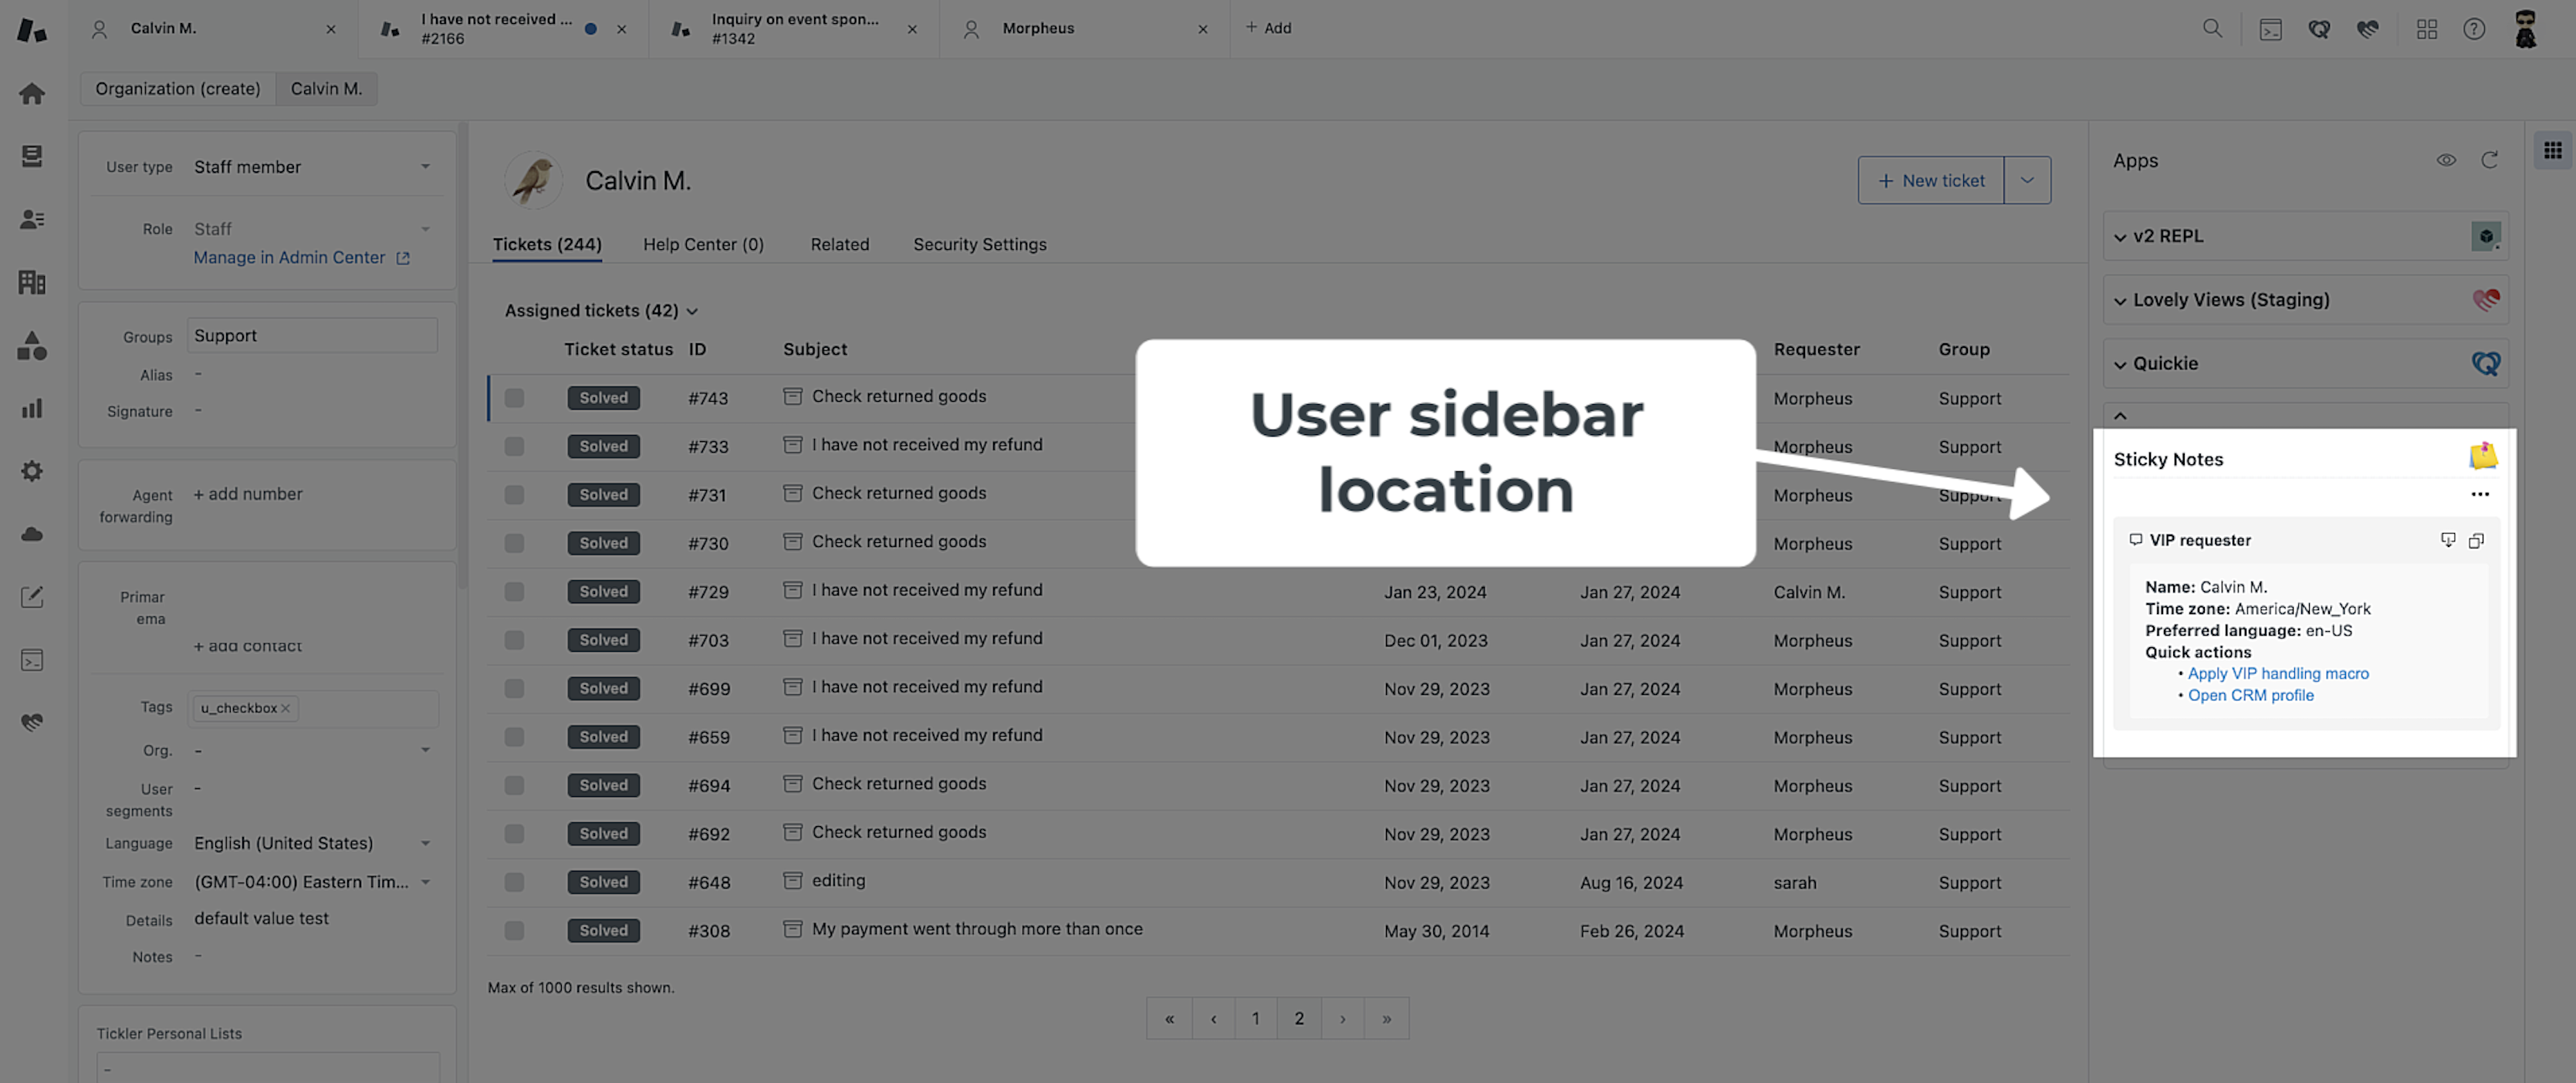
Show information on the user profile, such as account details, IDs, or preferences. To show the same data on tickets, add the user field to the ticket location as well.
Organization sidebar location
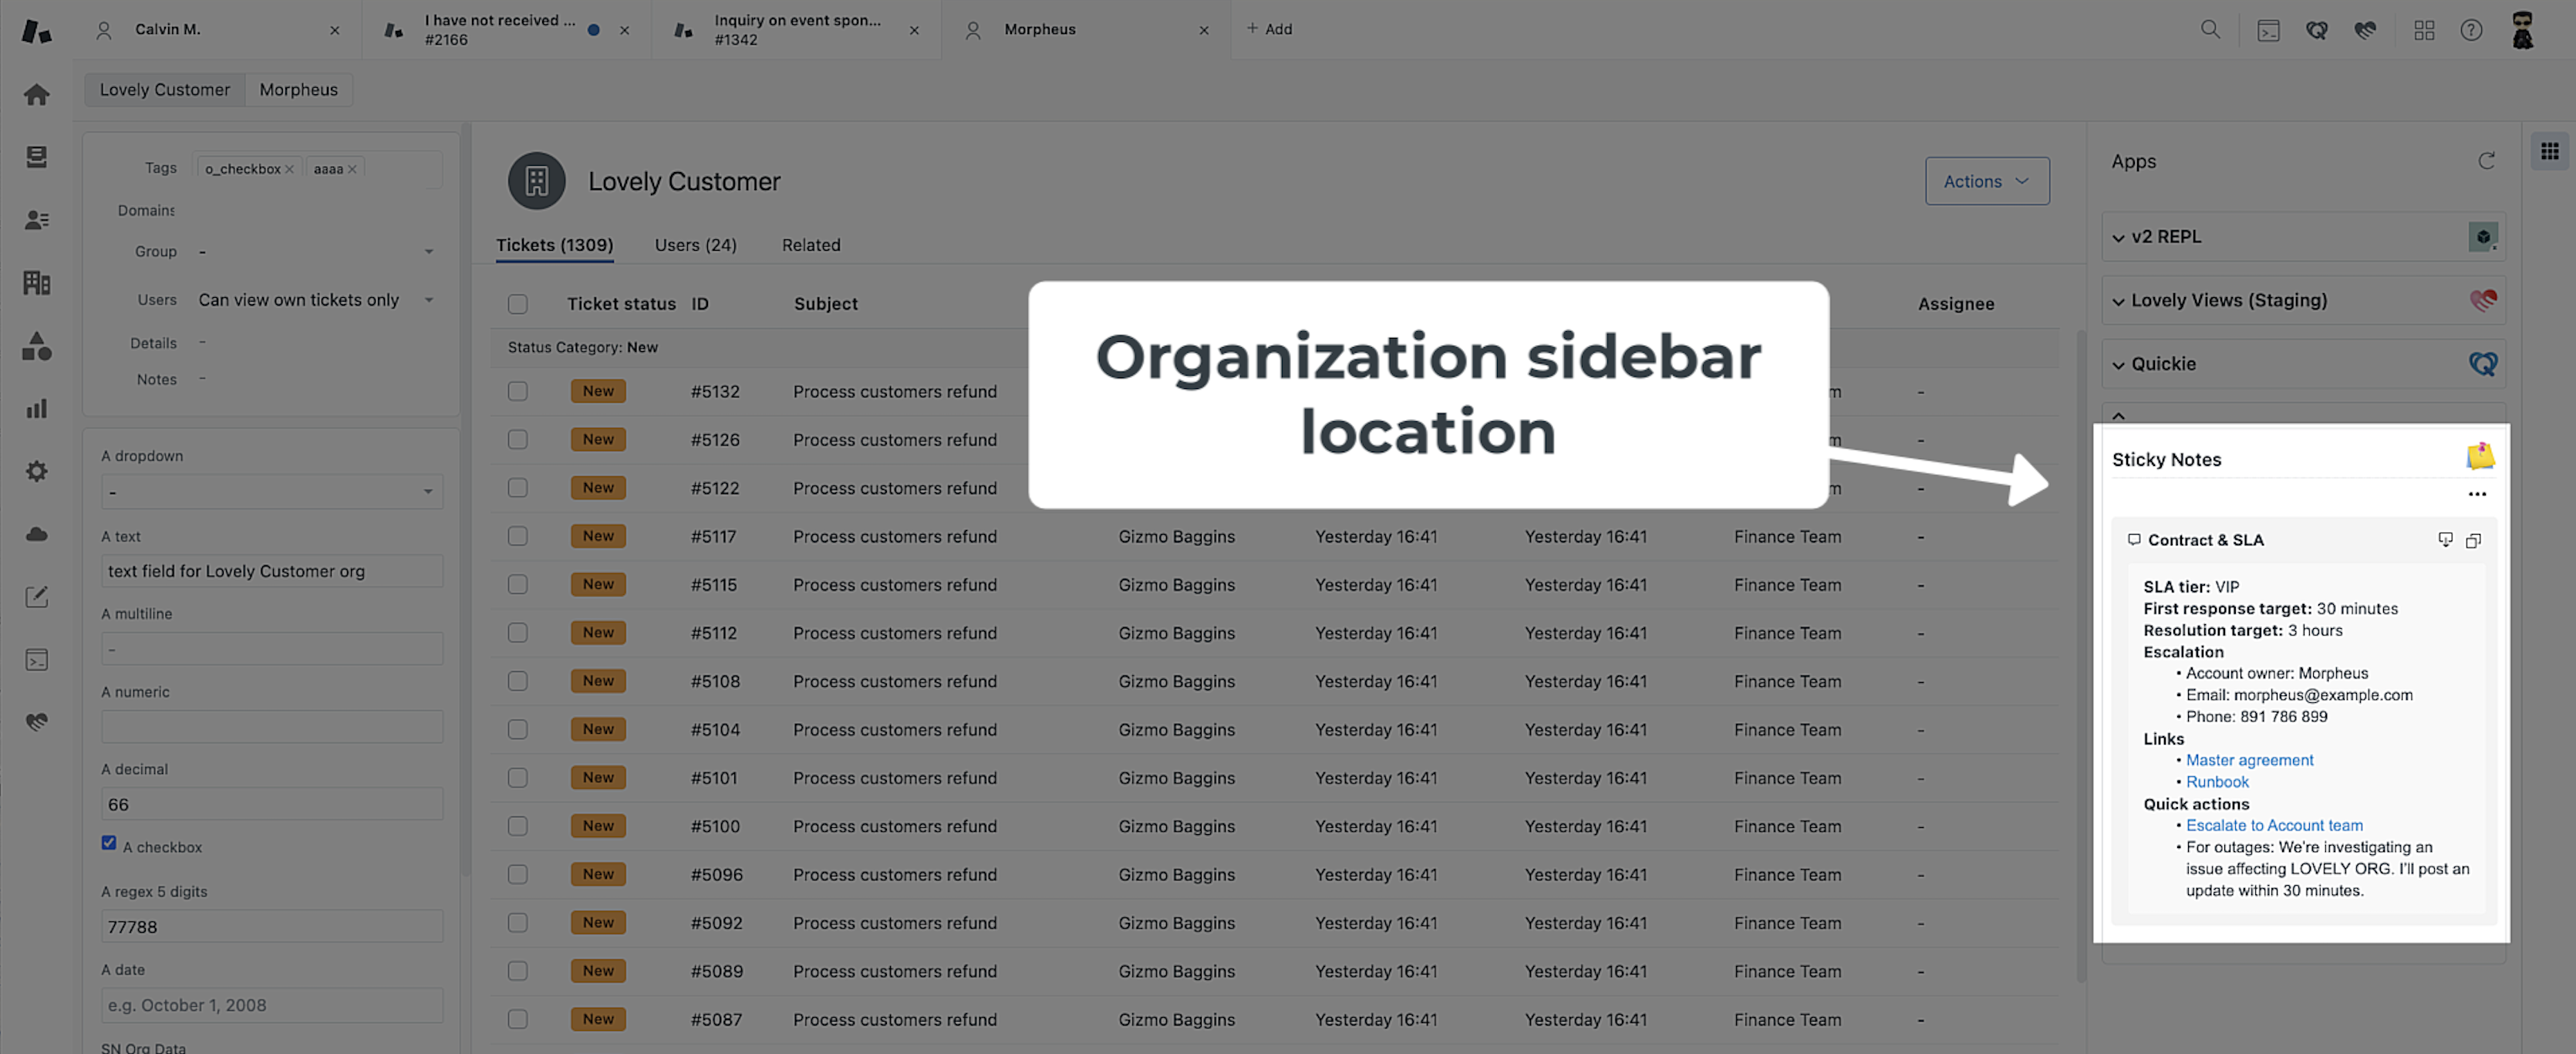
Show organization information, such as contract details, support instructions, or useful links. To show the same data on tickets, add the organization field to the ticket location as well.
Ticket editor location
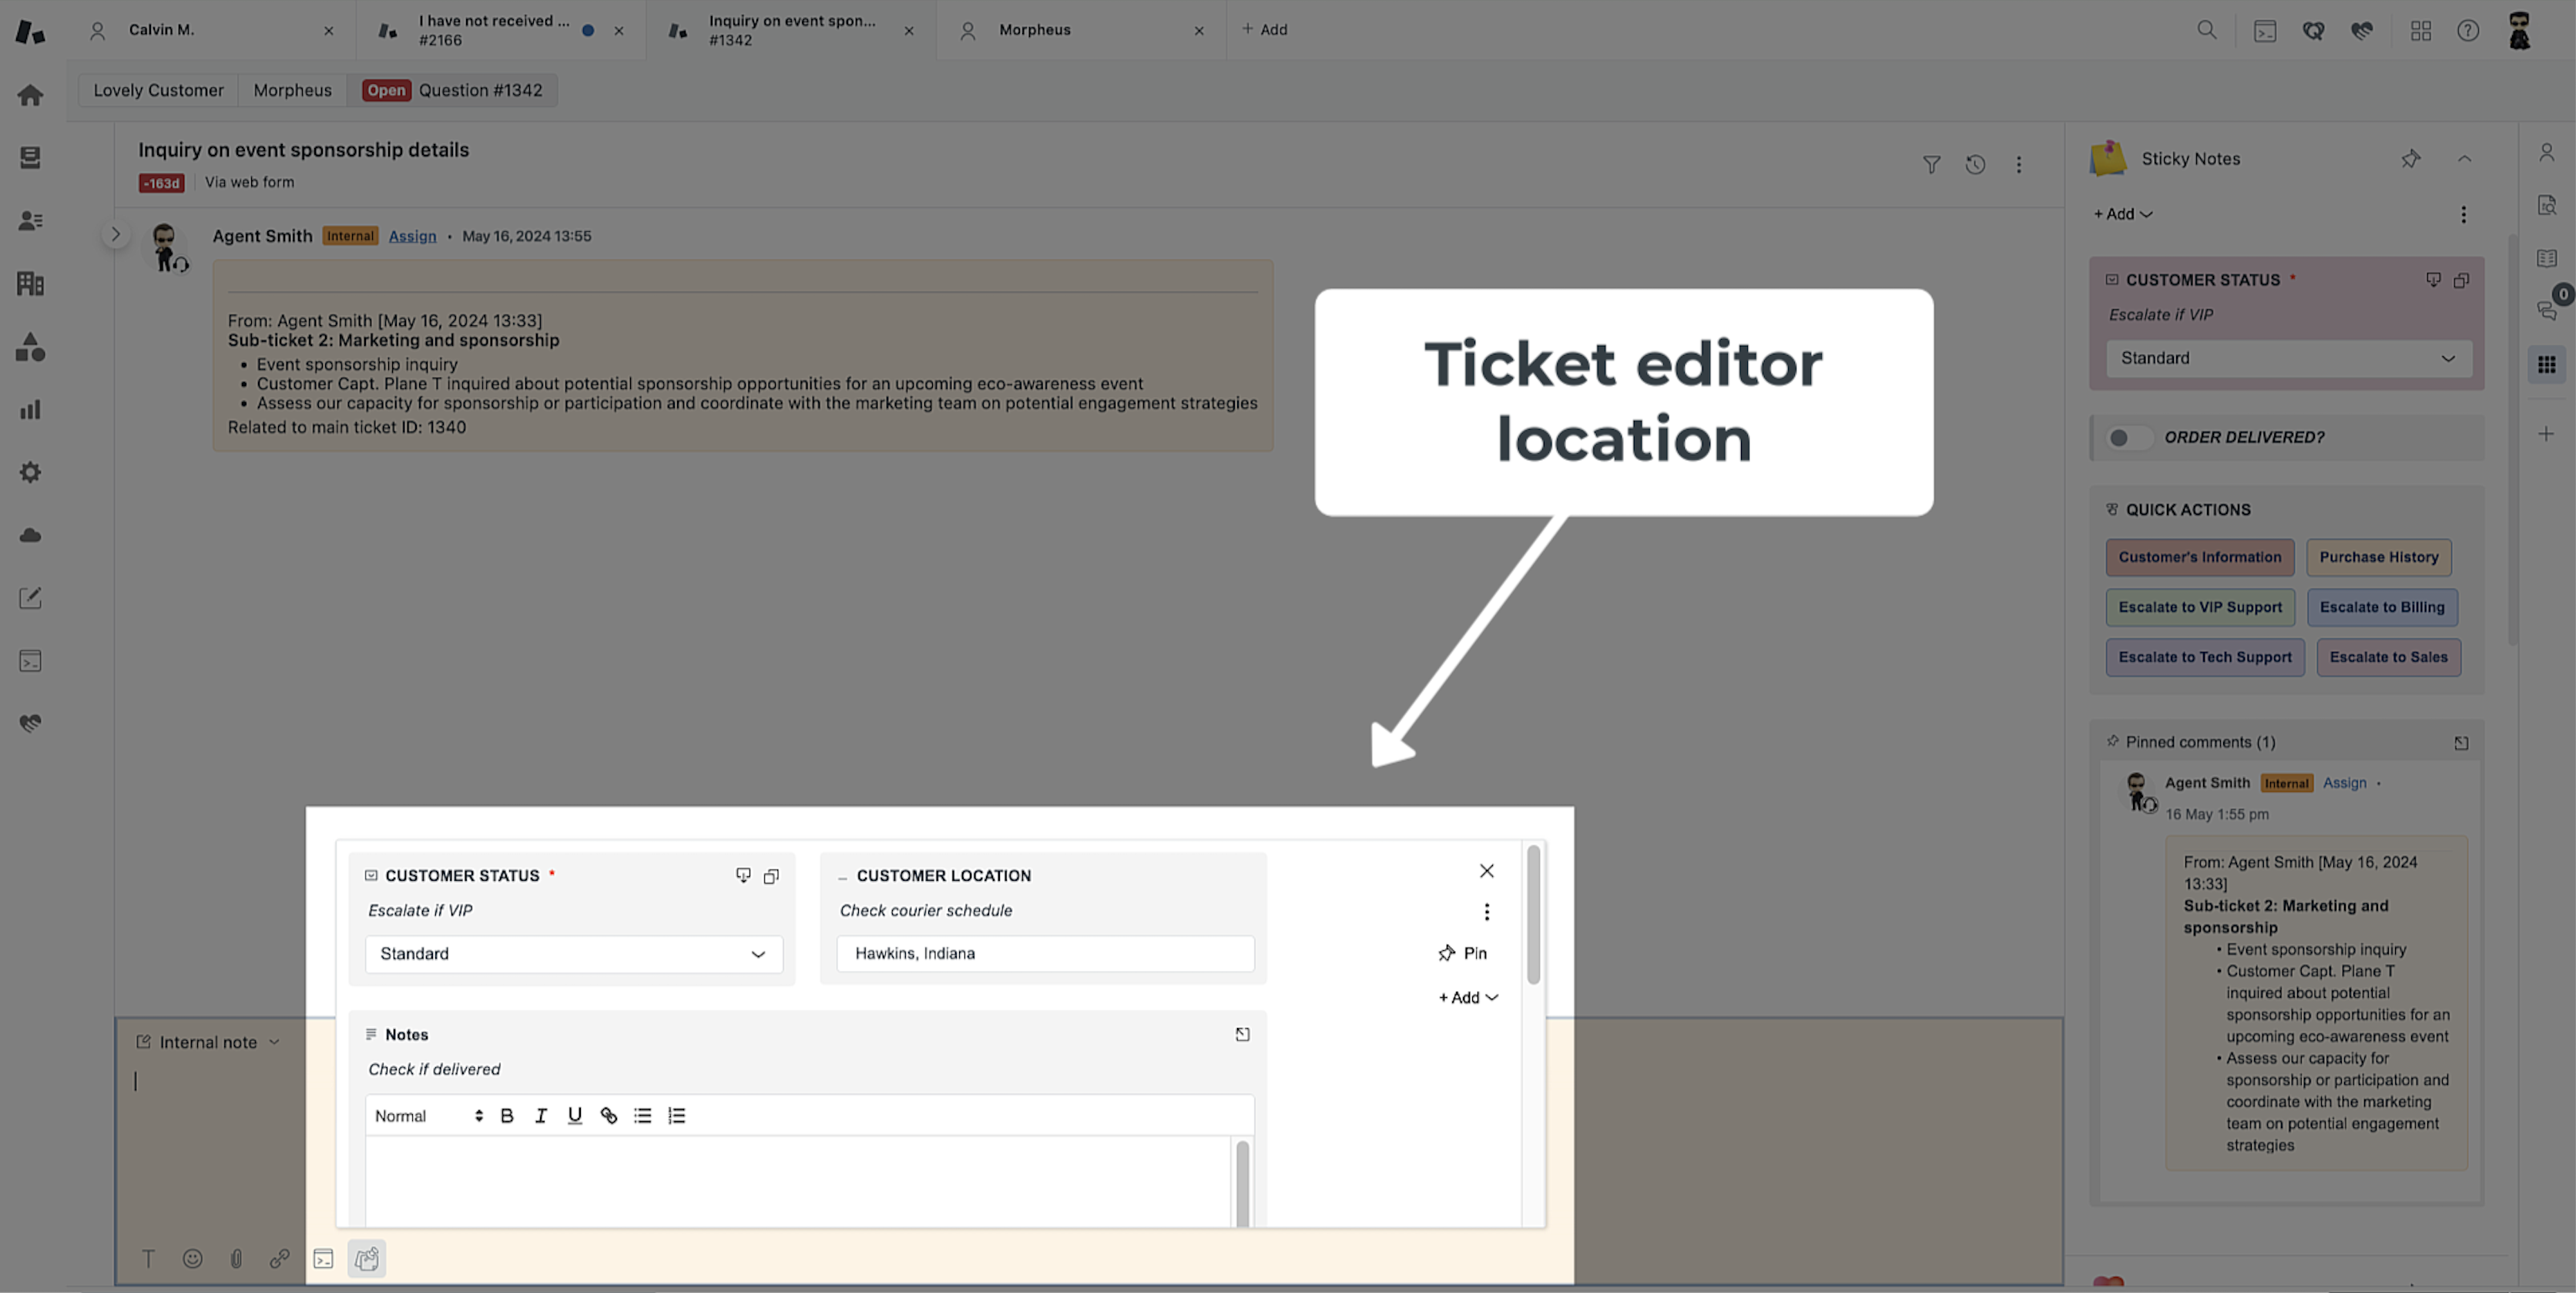
Sticky Notes can be added to the ticket editor, giving agents access to notes and tools while editing or updating a ticket.
When objects are configured for the ticket editor, a Sticky Notes icon appears in the editor. Selecting the icon opens a panel with the configured widgets. If no objects are set for this location, the icon does not appear.
The panel uses the same layout settings as the sidebars. Its width adjusts to the browser window.
The ticket editor location features a Pin button. When Pinned comments is set up in this location and Pin is enabled, the comment is pinned when the agent submits it.
Objects in the ticket editor location have an Insert button to copy their text into the editor. You can turn this on or off for each object.
Buttons can also be configured for the ticket editor. This allows agents to run Zendesk macros or open links while working in the ticket reply area.
Modify location preferences
Use these settings to control how objects appear in each location.
Always show in sidebar
Keep Sticky Notes visible in the sidebar even when it has no objects or fields to show.
Use empty fields dropdown
Group empty objects in a dropdown to save space in the app panel.
Empty objects display mode
Choose how empty objects appear by default.
Save ticket field updates
This option is available for New ticket sidebar or Ticket sidebar locations. Choose whether to save field changes immediately or when the ticket is submitted. Individual object settings can override this choice.
Objects in existing ticket sidebar
You can add Logged notes, Pinned comments, Zendesk fields, Notices, and Buttons .
Add more objects or drag and drop the items in the list into the order you want them to appear in the app. You can also clone, disable, or delete individual items in the list.
Common object settings
To edit an existing object, open App settings, select its location, select the object, update its settings, and click Save. Available settings depend on the object type and location.
The settings below are shared by several object types. Check each object's section for additional options.
- Enable
Turns the object on or off without deleting its configuration.
- Ticket / User / Organization
Choose the Zendesk record type that owns the data. The available choices depend on the location you are configuring.
- Field
Select an existing Zendesk field or, where available, automatically create one.
- Show/hide conditions
Always show the object, show it only when conditions match, or hide it when conditions match. Conditions can include roles, groups, brands, forms, tags, and other supported attributes.
- Read-only
Lets agents see the value in Sticky Notes without editing it through the app.
- Label
Sets the name shown to agents. Some labels support placeholders and Liquid markup.
- Value hint
Displays placeholder guidance inside an empty input. It is not saved as field data.
- Descriptions
Add guidance above or below an object, or in a tooltip beside its label.
- Max columns width
Controls how much horizontal space an object can use. Choose Auto, a fixed number of columns, or Full width.
- Force show app tray when not empty
Automatically opens the app tray when the object contains data, helping agents notice existing information.
- Label / field style
Controls visual emphasis so important information can stand out without changing the underlying Zendesk data.
Zendesk permissions still apply. For example, allowing all agents to edit Organization logged notes in Sticky Notes does not grant an agent permission to edit organization data if their Zendesk role or plan does not allow it.
Logged notes
Logged notes stores a running record of entries with the date, time, and author. Entries are saved in a Zendesk field and remain subject to its storage limits.
Logged notes - Features
Rich text editor (RTE)
Admins can choose between RTE fields and plain text for data entry.
Record edit permissions
Choose who can edit existing log entries by agent, group, or role. Admins can always edit them.
Personalized visibility
Choose whether agents can see the ticket ID, requester, date and time, and author.
Exclusive admin access
Admins can hide log history and choose whether new entries are also added as internal notes.
App tray visibility
Logged notes can automatically bring the app tray into view when they contain entries, helping agents notice existing information.
Logged notes - Add as a new object
1. In the Existing ticket sidebar location, click Add and choose Logged notes . You can also add it to the New ticket sidebar location.
2. Select your preferences and click Save.
Logged notes - Customize preferences
Choose how logged notes appear and who can edit them.
Enable
Turn this on to make the object active. Turn it off to keep the configuration without displaying the object.
Ticket / User / Organization
Choose whether to store the data in a ticket, user, or organization field.
Ticket field
Store information about an individual ticket.
User field
Store information about a user, such as a customer.
Organization field
Store information about an organization, such as a customer account.
Field
Choose Use existing field to select a field you already have, or Automatically create new field to create one.
Show/hide field
Choose to show the field when certain conditions are met, or to always show the field regardless of conditions.
Choose when to display the field:
Always show field
Show the field regardless of the conditions below.
Show field when conditions are met
Show the field only when the selected conditions match.
Hide field when conditions are met
Hide the field when the selected conditions match.
Set the conditions below:
Agent is in ANY of these role(s)
The agent has any of the selected roles.
Agent is in ALL of these group(s)
The agent belongs to all of the selected groups.
Agent is in ANY of these group(s)
The agent belongs to any of the selected groups.
Is ANY of these brand(s)
The ticket uses any of the selected brands.
Note: This option appears only when your Zendesk account has multiple brands.
Is ANY of these ticket form(s)
The ticket uses any of the selected forms.
Note: This option appears only when your Zendesk account has multiple ticket forms. Group assignment
The group condition depends on the location:
Is assigned to ANY of these group(s) -
For New ticket sidebar or Ticket sidebar -
The ticket is assigned to any of the selected groups.
Is in any of these group(s) - for User sidebar - The user profile being viewed belongs to any of the selected groups.
Is in any of these group(s) - for Organization sidebar - The organization is associated with any of the selected groups.
Contains ALL of these tag(s)
The ticket contains all of the entered tags.
Contains ANY of these tag(s)
The ticket contains at least one of the entered tags.
Read-only
Enable this to let agents view the field without editing it through Sticky Notes.
Use Read-only for reference information that agents should not edit through Sticky Notes.
When Read-only is on, agents can view the field but cannot edit it in the app.
Label
Enter the label agents will see for this object. Where supported, you can also use placeholders and Liquid markup.
Value hint
Enter placeholder guidance that appears inside an empty input. The hint disappears when the agent starts typing and is not saved as field data.
Force show app tray when not empty
Enable this to automatically show the app tray when this object contains data.
Disable RTE
Use plain text instead of the rich text editor. Formatting options will not be available.
Available formats of RTE
Choose the formatting tools agents can use, such as bold, italic, underline, and lists.
Who can edit/delete logs
Choose who can edit or delete log entries.
Admins
Only admins can edit or delete entries.
Admins and particular groups/roles/users
Admins and the selected groups, roles, or users can edit or delete entries.
All agents
All agents can edit or delete entries, subject to their Zendesk permissions.
Author can edit/delete their own logs
Let authors edit or delete their own entries. This does not change the permissions you set for other agents or admins.
Max columns width
Choose how many columns the object can use.
Auto
Most fields use one column. Multi-line fields, notices, logged notes, and pinned comments use two columns. Text fields with more than 30 characters also expand to two columns.
1, 2, 3, or 4
Choose a maximum width of 1, 2, 3, or 4 columns. The space available in the panel may limit the width.
Full width (All columns)
Use the full available width of the app panel.
Descriptions
Add instructions above or below the object, or in a tooltip.
Description above
Add optional guidance that appears above the object.
Description below
Add optional guidance that appears below the object.
Description tooltip
Add optional help text that appears when an agent hovers over the information icon.
Descriptions can include placeholders, such as {{username}} or {{email}}, and Liquid markup to show values from the selected field.
Show when empty
Choose how to display an empty field.
Default - Do not show when empty
Show the field in the empty field area at the top of the app.
Toggled on - Show when empty
Keep the empty field open so agents can enter a value.
Do not hide original field
Keep the original field visible in Zendesk's left sidebar. Sticky Notes hides it by default.
Label and field style
Change the appearance of the label and field using the settings below.
Text color
Choose the text color for the label and field.
Background color
Choose the background color for the label and field.
Font size
Choose the text size for the label and field.
Bold
Make the label and field text bold.
Italic
Make the label and field text italic.
Display ticket ID
Choose when agents can see the ticket ID.
Show
Always show the ticket ID.
Expand to reveal
Show the ticket ID when the entry is expanded.
Don't show
Hide the ticket ID from agents.
Display requester
Choose when agents can see requester details.
Show
Always show requester details.
Expand to reveal
Show requester details when the entry is expanded.
Don't show
Hide requester details from agents.
Display date/time
Choose when agents can see the date and time.
Show
Always show the date and time.
Expand to reveal
Show the date and time when the entry is expanded.
Don't show
Hide the date and time from agents.
Display author
Choose when agents can see the author's name.
Show
Always show the author's name.
Expand to reveal
Show the author's name when the entry is expanded.
Don't show
Hide the author's name from agents.
Hide history
Hide the log history from view.
Add log as internal note
Also add each new log entry to the ticket as an internal note.
Edit this object
Select this object in its location settings, make your changes, and click Save. See Common object settings for shared controls.
Pinned comments
Pinned comments keep selected ticket comments and side conversations easy to find.
Pinned comments - Features
Keep important details front and center
Pin customer details, approvals, or other important updates so agents can find them quickly.
Stay on the same page
Pin an entire side conversation or individual messages from email, Slack, Microsoft Teams, or linked tickets.
Keep your tickets organized
Use pinned comments for information agents need to refer to while working on the ticket.
Pinned comments - Add as a new object
1. In Zendesk's Admin Center, under Objects and rules > Tickets > Fields, create a new custom ticket field of the type Multi-line to store the pinned comments data.
2. Name the field, for example "Pinned Comments." Set its permissions to "Agents can edit," then click Save.
3. Reload Zendesk to see the new field in the field list.
4. Add the new field to the ticket forms where you want to use Pinned comments. In Zendesk's Admin Center, under Objects and Rules > Tickets > Forms , select a form. This example uses the Default ticket form (active).
5. Search for the field you created. In this example, it is Pinned comments.
6. Click + next to the field. Here, click + next to Pinned comments .
7. Check that the field appears in the form's field list.
8. Click Save.
9. Add Pinned comments to the Existing ticket sidebar or the Ticket editor location. In this example, open App settings and use Quick Start, choose Existing ticket sidebar.
10. Click Add.
11. Select Pinned comments . You can add one Pinned comments object per location.
12. Within the Pinned comments field setting, select the field you created. In this example, choose Pinned comments .
13. Comments appear newest first by default. To show the oldest comments first, enable Show oldest comment first toggle.
14. Click Save , then reload Zendesk.
15. Open a ticket and click Pinned comments to start pinning.
16. A dialog shows the ticket's public and private comments. Click Pin next to that comment.
17. Select Done to confirm, or Cancel to cancel.
18. The pinned comment is now visible on the sidebar.
19. If you selected Ticket editor as the location, click the Pin button at the top right to pin the comment when the ticket is submitted.
Pinned comments - Customize preferences
Choose the field, display order, and appearance of pinned comments.
Enable
Turn this on to make the object active. Turn it off to keep the configuration without displaying the object.
Pinned comments field
Select the custom ticket field that stores pinned comments data.
Show oldest comment first
Show comments from oldest to newest.
Label
Enter the label agents will see for this object. Where supported, you can also use placeholders and Liquid markup.
Field tag(s)
Enter tags to add to the ticket when this field is used.
Max columns width
Choose how many columns the object can use.
Auto
Most fields use one column. Multi-line fields, notices, logged notes, and pinned comments use two columns. Text fields with more than 30 characters also expand to two columns.
1, 2, 3, or 4
Choose a maximum width of 1, 2, 3, or 4 columns. The space available in the panel may limit the width.
Full width (All columns)
Use the full available width of the app panel.
Label style
Change the label's appearance.
Text color
Choose the label text color.
Background color
Choose the label background color.
Font size
Choose the label text size.
Bold
Make the label bold.
Italic
Make the label italic.
Export pinned comments to field (text formatted)
Select or create a field to store a plain-text copy of pinned comments for reporting or reference.
Export pinned comments to field (html formatted)
Select a field to store a copy of pinned comments with their HTML formatting.
Edit this object
Select this object in its location settings, make your changes, and click Save. See Common object settings for shared controls.
Pinned comments - Side conversations
Pin side conversations just like ticket comments. You can pin the whole conversation or individual messages.
Zendesk side conversations let agents contact colleagues, vendors, or other people from a ticket. Supported types include:
- Emails – Internal or external email threads related to the ticket.
- Slack messages – Conversations with teams for troubleshooting or approvals.
- Microsoft Teams chats – Messages exchanged with colleagues for collaboration.
- Linked tickets – References to related tickets or follow-up requests.
Pinning an entire side conversation
To pin an entire side conversation so the full discussion remains visible:
- Open the ticket containing the side conversation.
- Click Add - Pinned comments.
- Select Side conversations from the dropdown filter menu, or find the side conversation directly from the full list.
- Click the Pin button 📌 to add it to the Pinned comments list.
-
Click Save.
Best for: Keeping ongoing discussions accessible without needing to open multiple tabs.
Pinning a specific message or reply within a side conversation
If only part of a conversation is relevant, you can pin a specific message instead of the whole thread:
- Open the ticket containing the side conversation.
- Click Add - Pinned comments.
- Select Side conversations from the dropdown menu, or find the side conversation directly from the full list.
- Click the side conversation box to open the thread.
- Click the Pin button 📌 next to a specific message or reply to add it to the Pinned comments list.
- Click the X button on the top-left of the side conversation thread to return to the main comments list.
-
Click Save.
Best for: Highlighting specific details like approval confirmations, next steps, or troubleshooting instructions.
Pinned comments - Filtering comments
Pin or unpin messages as needed to keep important information easy to find.
Use the dropdown to filter the comment list:
- All comments – Displays every comment in the ticket, including side conversations.
- Ticket comments – Shows public replies and internal notes on the ticket.
- Requester’s comments – Filters to display only messages from the ticket requester.
- Internal comments – Displays only private notes added by agents.
- Public replies – Shows only customer-facing responses.
-
Side conversations – Shows side conversations. Click one to open the full thread.
Zendesk fields
Use a Zendesk field to store notes or other information that agents enter in Sticky Notes. Select an existing field or create a new one. Supported field types include:
- Checkbox
- Drop-down
- Text
- Multi-line
- Multi-select
- Numeric
- Decimal
- Date
- Credit card
- Regex
If you use multiple ticket forms, add the field to each form where agents need to use it. If the field is missing from a form, Sticky Notes may hide it or show it as read-only, depending on the object's settings.
Notes
Notes (contained inside Zendesk field ) let agents record information about tickets, users, or organizations.
Continuous updates
Update notes as new information becomes available.
Field types
Choose a field type that suits the information you need to store.
Collaboration
Let your team view and update shared information.
Rich text editing
Format notes to make them easier to read.
Customizable fields
Use separate fields for different types of information.
Shared reference
Keep details in one place for agents to refer to.
Handovers
Leave clear information for the next agent working on the ticket.
Zendesk field - Add as a new object
1. In this example, in the Existing ticket sidebar location, click Add and choose Zendesk field . You can also add it to another location.
2. Select your preferences and click Save.
Zendesk field - Customize preferences
Choose which field to use, when to show it, and how it should look.
Enable
Turn this on to make the object active. Turn it off to keep the configuration without displaying the object.
Ticket / User / Organization
Choose whether to store the data in a ticket, user, or organization field.
Ticket field
Store information about an individual ticket.
User field
Store information about a user, such as a customer.
Organization field
Store information about an organization, such as a customer account.
Field
Choose Use existing field to select a field you already have, or Automatically create new field to create one.
Save ticket field updates
Use the default save behavior, or choose whether to save changes immediately or when the ticket is submitted.
Show/hide field
Choose when to show or hide the field:
Always show field
Show the field regardless of the conditions below.
Show field when conditions are met
Show the field only when the selected conditions match.
Hide field when conditions are met
Hide the field when the selected conditions match.
Set the conditions below:
Agent is in ANY of these role(s)
The agent has any of the selected roles.
Agent is in ALL of these group(s)
The agent belongs to all of the selected groups.
Agent is in ANY of these group(s) The agent belongs to any of the selected groups.
Is ANY of these brand(s)
The ticket uses any of the selected brands.
Note: This option appears only when your Zendesk account has multiple brands.
Is ANY of these ticket form(s)
The ticket uses any of the selected forms.
Note: This option appears only when your Zendesk account has multiple ticket forms.
Group assignment
The group condition depends on the location:
Is assigned to ANY of these group(s) -
For New ticket sidebar or Ticket sidebar -
The ticket is assigned to any of the selected groups.
Is in any of these group(s) -
For User sidebar -
The user belongs to any of the selected groups. This checks the assignee group ID against the specified group IDs to determine whether to show or hide the field.
Is in any of these group(s) -
For Organization sidebar -
The organization is associated with any of the selected groups. This condition uses the group ID(s) associated with the organization to which the user belongs.
Contains ALL of these tag(s)
The ticket contains all of the entered tags.
Contains ANY of these tag(s)
The ticket contains at least one of the entered tags.
Read-only
Enable this to let agents view the field without editing it through Sticky Notes.
Use Read-only for reference information. Turning on Read-only prevents agents from editing it through Sticky Notes.
When Read-only is on, agents can view the field but cannot edit it in the app.
If field is not in form
Choose what happens when the field is missing from the current ticket form.
Hide field
The field will not be displayed if it is not part of the ticket form.
Show as read-only
The field will be visible but cannot be edited if it is not part of the ticket form.
Label
Enter the label agents will see for this object. Where supported, you can also use placeholders and Liquid markup.
Value hint
Enter placeholder guidance that appears inside an empty input. The hint disappears when the agent starts typing and is not saved as field data.
Default value
Set a starting value for an empty field on a new ticket. The value appears when Sticky Notes runs, before the ticket has been saved or submitted.
The default value input matches the field type. For a dropdown field, select a value from the dropdown.
Rich text fields use the rich text editor for the default value.
When the default value is saved depends on the field type:
For user or organization fields - The default value is saved automatically after the app runs.
For ticket fields - The agent must save the ticket to save the default value.
Force show app tray when not empty
Enable this to automatically show the app tray when this object contains data.
Max columns width
Choose how many columns the object can use.
Auto
Most fields use one column. Multi-line fields, notices, logged notes, and pinned comments use two columns. Text fields with more than 30 characters also expand to two columns.
1, 2, 3, or 4
Choose a maximum width of 1, 2, 3, or 4 columns. The space available in the panel may limit the width.
Full width (All columns)
Use the full available width of the app panel.
Field tag
Enter tags to add to the ticket when the field has a value.
Disable RTE
Use plain text instead of the rich text editor. Formatting options will not be available.
Available formats of RTE
Choose the formatting tools agents can use, such as bold, italic, underline, and lists.
Auto make clickable links
Turn web addresses in plain text into clickable links.
Disallow agent entered link modifiers
Prevent agents from entering links that insert or replace comment text or run macros, such as #insert, #comment, and #macro .
Description above
Add optional guidance that appears above the object.
Description below
Add optional guidance that appears below the object.
Description tooltip
Add optional help text that appears when an agent hovers over the information icon.
Descriptions can include placeholders, such as {{username}} or {{email}}, and Liquid markup to show values from the selected field.
Show when empty
You have the option to customize how an empty field is displayed to users.
Default - Do not show when empty
Show the field in the empty field area at the top of the app.
Toggled on - Show when empty
Keep the empty field open so agents can enter a value.
Do not hide original field
Keep the original field visible in Zendesk's left sidebar. Sticky Notes hides it by default.
Label and field style
Change the appearance of the label and field using the settings below.
Text color
Choose the text color for the label and field.
Background color
Choose the background color for the label and field.
Font size
Choose the text size for the label and field.
Bold
Make the label and field text bold.
Italic
Make the label and field text italic.
Edit this object
Select this object in its location settings, make your changes, and click Save. See Common object settings for shared controls.
Notices
Notices show messages, reminders, or alerts to agents while they work in Zendesk. Use them for information such as customer requirements or ticket-handling instructions. A notice can appear in the sidebar or as a popup, and conditions control when it is shown.
Notice examples
Use these examples to choose a notice behavior, then follow the configuration steps below.
Show a notice once per agent
Use the Show once per agent (per notice) option to display a Notice once to each agent across all tickets. The notice will appear again if its text is updated. Learn more about notice modal timing.
Record notice acknowledgements
Record an agent’s acknowledgement as a public or private ticket comment, providing a visible audit trail on the ticket. Learn more about recording acknowledgements.
Show notice modals on new tickets
Display notice modals while an agent is creating a new ticket, including notices triggered by tags belonging to the selected requester or their organization.Learn more about the new ticket sidebar.
Notices - Features
Dynamic alerts
Show read-only messages based on ticket information.
Centralized communication
Keep notices in one container, or use separate containers to group related notices.
Prominent highlighting
Show an alert when a ticket has a particular tag or field value. Use text size and color to make it stand out.
Advanced customization
Use placeholders and Liquid markup to change the notice text based on ticket values or conditions.
Show notice in popup modal
Display an important notice in a popup when the ticket opens.

Show requester and organization alerts in new tickets
Show requester or organization information while an agent creates a ticket, before it is submitted. Read more about this feature.
Notices - Link modifiers
Add a modifier to a link to choose what happens when an agent clicks it:
#insert
Add the link's text below any text already in the comment editor.
#comment
Replace all text in the comment editor with the link's text.
#macro:123456
Run the macro with this ID. Find the ID in the browser address bar when editing the macro.
Notices - Add as a new object
1. In this example, in the Existing ticket sidebar location, click Add and choose Notices . You can also add notices to another location.
2. Click Add to create an individual notice inside the container.
3. Give the notice a name you can recognize in settings. Agents will not see this name.
4. In the notice settings page, choose Show notice when conditions are met and specify tags in the Contains ALL... and/or Contains ANY... fields.
5. Enter your message in the Notice text field. To make part of it clickable, select that text and click the link icon. In this example, the link runs macro 123456.
6. Add more notices if you need different messages or conditions. You can include several suggestions in one notice, as shown below, or create a separate notice for each.
7. Use Liquid markup in the Notice text field to change the message based on conditions or field values.
8. Use placeholders to include ticket details, such as the requester's name, just as you would in a macro.
9. Click Save to apply your settings.
Notices (container) - Customize preferences
Choose how the notice container appears.
Enable
Turn this on to make the object active. Turn it off to keep the configuration without displaying the object.
Notices list
Add notices here, or drag them into the order you want. Open a notice to edit its text and conditions.
Label
Enter the label agents will see for this object. Where supported, you can also use placeholders and Liquid markup.
Max columns width
Choose how many columns the object can use.
Auto
Most fields use one column. Multi-line fields, notices, logged notes, and pinned comments use two columns. Text fields with more than 30 characters also expand to two columns.
1, 2, 3, or 4
Choose a maximum width of 1, 2, 3, or 4 columns. The space available in the panel may limit the width.
Full width (All columns)
Use the full available width of the app panel.
Description tooltip
Add optional help text that appears when an agent hovers over the information icon.
Label style
Choose the label's text color, background color, size, and bold or italic formatting.
Notices (individual) - Customize preferences
Choose the text, conditions, and appearance of each notice.
Name
Enter a name to help you find the notice in settings. This name is not shown to agents.
Enable
Turn this on to make the object active. Turn it off to keep the configuration without displaying the object.
Show/hide notice
Choose when to show or hide the notice:
Always show notice (if notice text exists)
The notice
will be displayed as long as it contains text.
Show notice when conditions are met
Show the notice only when the selected conditions match.
Hide notice when conditions are met
Hide the notice when the selected conditions match.
Set the conditions below:
Agent is in ANY of these role(s)
The agent has any of the selected roles.
Agent is in ALL of these group(s)
The agent belongs to all of the selected groups.
Agent is in ANY of these group(s)
The agent belongs to any of the selected groups.
Is ANY of these brand(s)
The ticket uses any of the selected brands.
Note: This option appears only when your Zendesk account has multiple brands.
Is ANY of these ticket form(s)
The ticket uses any of the selected forms.
Note: This option appears only when your Zendesk account has multiple ticket forms.
Group assignment
The group condition depends on the location:
Is assigned to ANY of these group(s) -
New ticket sidebar or Ticket sidebar -
The ticket is assigned to any of the selected groups.
Is in any of these group(s) -
User sidebar -
The user belongs to any of the selected groups. This evaluates the group membership based on the group ID(s) associated with the user profile being viewed.
Is in any of these group(s) -
Organization sidebar -
The organization is associated with any of the selected groups. This condition uses the group ID(s) associated with the organization to which the user belongs.
Contains ALL of these tag(s)
The ticket contains all of the entered tags.
Contains ANY of these tag(s)
The ticket contains at least one of the entered tags.
These conditions determine whether to show or hide the notice, according to the option selected above.
Tag-based conditions are evaluated immediately when tags are added or removed. The Save ticket field updates setting does not control when notice conditions are evaluated.
On a new ticket, conditions can also use tags belonging to the selected requester or their organization. Changing the requester causes the conditions to be evaluated again.
Show notice in modal
Display an important notice in a popup when the ticket opens.
Show notice in modal
Enable this option to display the Notice in a popup modal. Only the ticket currently being viewed can display a Notice modal. Notices triggered in background ticket tabs wait until the agent opens that ticket.
Also show notice in sidebar
Enable this option if the notice should remain visible in the sidebar after its modal is closed.
Show when?
For existing tickets, choose from:
When ticket is first viewed: Shows once when the ticket is first opened.
Every time ticket is viewed: Shows each time the agent opens the ticket.
Show once per agent (per notice): Shows once to each agent across all tickets. It appears again if the Notice text is changed.
For the new ticket sidebar, choose from:
Every time a new ticket is composed
Show once per agent (per notice)
A Notice already acknowledged will not appear again during the same ticket view if its conditions temporarily stop matching and then match again.
Confirmation button text
Enter the text shown on the confirmation button, such as Got it or Understood. If left blank, OK is used.
Extra confirmation action
Choose whether to include an additional step before agents can close the modal:
- None – The modal can be dismissed by clicking the confirmation button.
-
Checkbox – Require agents to tick a checkbox, such as “I understand,” before they can confirm and close the popup.
Use a popup for notices agents need to see even when the Sticky Notes sidebar is collapsed.
Record acknowledgement
Choose how the acknowledgement should be handled:
- No: Do not add an acknowledgement comment.
- Add to comment box: Insert the acknowledgement text into the ticket editor for the agent to submit.
- Add to ticket immediately: Post the acknowledgement directly to an existing ticket.
Acknowledgements can be recorded as public or private comments. Add to ticket immediately is not available on the new ticket sidebar because the ticket has not yet been created.
New acknowledgement comments use the following default text:
Notice acknowledged by {{current_user.name}}.
The acknowledgement text is required only when acknowledgement recording is enabled.
Notice text
Enter the content that will appear in the notice. Rich text, placeholders, and Liquid markup can be used to create dynamic content.
New Notices include the following default text:
Please review and acknowledge this notice before continuing.
Notice text is required when Show notice in modal is enabled.
For a sidebar-only Notice using tag conditions, Notice text can be left blank. Sticky Notes will display the matching tags as a list, allowing the Notice to be used as a pinned tags feature.
Description tooltip
Add optional help text that appears when an agent hovers over the information icon.
Description above
Add optional guidance that appears above the object.
Description below
Add optional guidance that appears below the object.
Field style
Customize the notice field's appearance.
Text color
Choose the text color.
Background color
Choose the background color.
Font size
Choose the text size.
Bold
Make the text bold.
Italic
Make the text italic.
Force show app tray when not empty
Enable this to automatically show the app tray when this object contains data.
Show changes
Choose how to display changes to field values used in a notice.
Yes, show changes with old and new value
Show the old value crossed out beside the new value.
No, only show new value
Show only the new value.
This applies to field values displayed using placeholders or Liquid markup.
Edit this object
Select this object in its location settings, make your changes, and click Save. See Common object settings for shared controls.
Buttons
Buttons let agents run a Zendesk macro, open a link, or do both with one click. Add them where your team needs them, including the new ticket sidebar, existing ticket sidebar, or ticket editor.
Buttons - Features
Run a macro and open a link
A button can run a macro and open a URL in a new browser tab at the same time.
Macro execution
The Macro setting lets you choose the macro to run.
Open URL setting
Use Open URL below Macro to enter a link for the button to open.
Group buttons
Keep related buttons together in a container.
Buttons in the ticket editor
In the ticket editor, agents can use buttons from the reply area. Learn how to add buttons.
Buttons - Add as a new object
1. In this example, in the Existing ticket sidebar location, click Add and choose Buttons . You can also add buttons to other locations, including the ticket editor.
2. Set your main preferences and click Add to create individual buttons.
Buttons (container) - Customize preferences
Choose how the button container appears.
Enable
Turn this on to make the object active. Turn it off to keep the configuration without displaying the object.
Label
Enter the label agents will see for this object. Where supported, you can also use placeholders and Liquid markup.
Max columns width
Choose how many columns the object can use.
Auto
Most fields use one column. Multi-line fields, notices, logged notes, and pinned comments use two columns. Text fields with more than 30 characters also expand to two columns.
1, 2, 3, or 4
Choose a maximum width of 1, 2, 3, or 4 columns. The space available in the panel may limit the width.
Full width (All columns)
Use the full available width of the app panel.
Label style
Change the label's appearance.
Text color
Choose the label text color.
Background color
Choose the label background color.
Font size
Choose the label text size.
Bold
Make the label bold.
Italic
Make the label italic.
Buttons
Add buttons for common tasks, such as assigning a ticket to Support - Tier 1, Support - Tier 2, Sales and Billing . Open a button to edit it, or drag buttons into the order you want.
Buttons (individual) - Customize preferences
Choose what each button does and when it appears.
Enable
Turn this on to make the object active. Turn it off to keep the configuration without displaying the object.
Macro
Select the macro to run when an agent clicks the button.
Type part of a macro’s name to search the list. Continue scrolling to load more macros, which is useful for accounts with large macro libraries. A previously selected macro remains available at the top when the dropdown is reopened.
A Button linked only to a deleted or inaccessible macro is hidden from the affected agent. If the Button also contains a URL, it remains available so the link can still be opened.
Create and edit macros in Zendesk Admin Center, then select one in the button settings. See Zendesk - Macros resources.
Open URL
Enter a URL to open in a new browser tab. You can use placeholders and Liquid markup to include ticket information in the URL.
Label
Enter the label agents will see for this object. Where supported, you can also use placeholders and Liquid markup.
Show/hide button
Choose when to show or hide the button:
Always show button
Show the button regardless of the conditions below.
Show button when conditions are met
Show the button only when the selected conditions match.
Hide button when conditions are met
Hide the button when the selected conditions match.
Set the conditions below:
Agent is in ANY of these role(s)
The agent has any of the selected roles.
Agent is in ALL of these group(s)
The agent belongs to all of the selected groups.
Agent is in ANY of these group(s)
The agent belongs to any of the selected groups.
Is ANY of these brand(s)
The ticket uses any of the selected brands.
Note: This option appears only when your Zendesk account has multiple brands. Is ANY of these ticket form(s)
The ticket uses any of the selected forms.
Note: This option appears only when your Zendesk account has multiple ticket forms.
Is assigned to ANY of these group(s)
The ticket is assigned to any of the selected groups.
Contains ALL of these tag(s)
The ticket contains all of the entered tags.
Contains ANY of these tag(s)
The ticket contains at least one of the entered tags.
These conditions determine whether to show or hide the button, according to the option selected above.
Description tooltip
Add optional help text that appears when an agent hovers over the information icon.
Description above
Add optional guidance that appears above the object.
Description below
Add optional guidance that appears below the object.
Confirmation require
Ask agents to confirm before running the button's action.
Confirmation message
Enter the message agents see before confirming the action. It can include rich text, placeholders, and Liquid markup.
Field style
Customize the button field's appearance.
Text color
Choose the text color.
Background color
Choose the background color.
Font size
Set the size of the text from a range of options for better readability.
Bold
Make the text bold to draw attention or denote importance.
Italic
Italicize the text for emphasis or stylistic preference.
Edit this object
Select this object in its location settings, make your changes, and click Save. See Common object settings for shared controls.
Object management
Clone, enable, disable, or delete objects using the steps below.
Clone an object
Clone an object to copy it to another location.
Efficiency
Save time by duplicating objects instead of recreating them from scratch.
Consistency
Reuse the same settings in another location.
Flexibility
Copy objects to the locations where agents need them.
Each destination receives an independent copy of the object. Editing a clone in one location does not change the source object or copies in other locations.
Sticky Notes keeps settings supported by the destination and removes settings that are not available there. Settings that are only temporarily hidden because of another selection are retained.
When cloning a notice into the new ticket sidebar:
- When ticket is first viewed becomes Show once per agent (per notice).
- Add to ticket immediately becomes Add to comment box.
Sticky Notes also prevents cloning the same Zendesk field into a location where it is already configured.
These safeguards apply to new clone actions. Objects cloned before the recent update are not changed automatically.
1. Select the object: Find the object in the list without opening it.
2. Access the Clone option: Click the three-dot menu to the right of the object's name.
3. Select Clone: Choose Clone .
4. Select new location: Choose a destination. The current location is not listed.
5. Save changes: Click Clone to create the copy, or Cancel to cancel.
6. Check the new location: Check that the copy appears in the selected location.
Disable an object
Disabling an object temporarily removes it from active use without deleting
it.
1. Select the object: Find the object in the list without opening it.
2. Access the Disable option: Click the three-dot menu to the right of the object's name.
3. Select Disable: Choose Disable .
4. Save changes: Click Yes to confirm, or No to cancel.
5. Check the change: Check that the object is marked as disabled. Agents will no longer see it in the app.
Enable an object
Enable a disabled object to make it available again.
1. Select the object: Find the disabled object you want to enable in the list without opening it.
2. Access the Enable option: Click the three-dot menu to the right of the object's name.
3. Select Enable: Choose Enable .
4. Save changes: Click Yes to proceed and
save
the changes, or click No if you've changed your mind.
5. Check the change: Check that the object is no longer marked as disabled and appears in the app again.
Delete an object
You can delete an object to remove it permanently from the app.
1. Select the object: Find the object you want to delete in the list without opening it.
2. Access the Delete option: Click the three-dot menu to the right of the object's name.
3. Select Delete: Choose Delete .
4. Save changes: Click Yes to proceed and
save
the changes, or click No if you've changed your mind.
5. Check the change: Check that the object no longer appears in the list.
Backup & Restore
Use Backup & Restore to save a copy of your Sticky Notes settings and restore them later.
1. Click More options on Sticky Notes.
2. Select App settings.
3. Click Backup & Restore.
4. Choose Backup or Restore.
Backup
Copy your current settings as JSON so you can restore them later:
1. Open the Backup section.
2. Select and copy all the JSON text.
3. Paste it into a plain-text or code editor and save the file. Keep the JSON formatting unchanged.
Restore
Use a saved backup to replace your current Sticky Notes settings.
1. Open the Restore section.
2. Paste the JSON from your backup into the text box.
3. Click Restore to replace the current settings with the backup.
Restore replaces the Sticky Notes configuration with the saved settings. It does not restore ticket, user, or organization field values.
Using images
Paste small images into notes, or link to images hosted elsewhere.
When to use images:
- Visual clarity: Use a screenshot to show a step that is difficult to explain in text.
- Quick reference: Include a diagram agents need to refer to while working.
- Improved communication: Show an example of the result agents should expect.
- Keep images relevant: Include images that help agents complete the task, and leave out decorative images.
Direct insertion
Use small images that fit within the 65KB size limit for the field. Paste them into the rich text editor to store them with the note.
How to directly insert images:
- For Windows and Mac, use tools like Snipping Tool or screenshot shortcuts to capture and copy images directly to the clipboard.
- Paste these images directly into the RTE of Sticky Notes.
External embedding
For larger images, use a link to an image hosted in your Help Center, a ticket attachment, or another location your agents can access.
How to embed images externally:
- Use the Zendesk Help Center to host images, linking them within your notes.
- If you use ticket attachments, make sure agents can access them and that your retention settings will keep them available.
- Check that externally hosted images are accessible to your team.
For step-by-step details on each method, refer to our how-to article:
Options for handling images in Sticky Notes.
Best practices
Use these recommendations to keep a Sticky Notes setup easy to understand and maintain.
For admins
- Use one object for one clear purpose. Separate troubleshooting notes, account information, approvals, and other workflows rather than forcing unrelated information into one field.
- Use conditional visibility instead of showing everything. Role, group, brand, form, and tag conditions can keep the sidebar focused on what is relevant to the current agent and ticket.
- Keep labels short and consistent. Agents should be able to tell what belongs in a field without opening extra documentation.
- Use read-only for reference data. Show reference information as read-only if agents should not edit it.
- Choose the right location. Put intake guidance in the New ticket sidebar, working context in the Ticket sidebar, reply-time tools in the Ticket editor, and reusable customer or account information in User or Organization sidebars.
- Back up before major configuration changes. Export the configuration before restructuring locations, cloning many objects, or changing a large set of conditions.
- Check Zendesk permissions when editing fails. Sticky Notes object permissions do not override Zendesk role or plan restrictions.
For agents
- Use Logged notes for a running record and Pinned comments for information already present in the ticket conversation.
- Keep notes concise and specific. Consistent wording makes handovers and future searches easier.
- Pay attention to notices and acknowledgement prompts. They may contain instructions or information you need before continuing.
- Reload Zendesk after an admin changes Sticky Notes configuration if the update does not appear immediately.
Troubleshooting & FAQs
Common troubleshooting
Why can an agent see an object but not edit it?
Check both the Sticky Notes object's edit/read-only settings and the agent's Zendesk permissions. Sticky Notes does not grant permissions that Zendesk itself does not provide.
Why isn't an object appearing?
Confirm the object is enabled, the correct location is configured, its show/hide conditions match, and the current agent has access to the installation. If the configuration was just changed, reload Zendesk.
Why can't I select a Zendesk field?
The field may already be used by another Sticky Notes object in that location, may not be compatible with the selected record type, or may not yet be available after creation. Refresh and check the field configuration in Zendesk Admin Center.
Why don't pinned comments appear on a new ticket?
A new ticket has no submitted comments yet, so Pinned comments are not available in the New ticket sidebar.
Why isn't the Ticket editor location available on a closed ticket?
Zendesk does not provide the comment editor on closed tickets, so Sticky Notes cannot show its Ticket editor location there.
Why did a “Show once per agent” notice appear again?
The record is stored in the agent's browser. It may appear again on another device, in another browser, or after browser data is cleared. Updating the Notice text also causes it to display again.
More FAQs
How do I display a user field on all tickets created by that user?
To show a requester field on tickets:
- Navigate to App settings.
-
Under the Ticket sidebar location, click
Add and select Zendesk field.
-
Use the dropdown menu under
Ticket / User / Organization to choose
User field (Requester) .
- Under Field , select the user field you want to display.
Repeat these steps for any other user fields you want to show.
You can make the field editable or read-only, and use conditions to control when it appears.
For these settings, see Zendesk fields - Customize preferences.
What can links in a notice do?
Use link modifiers to insert text, replace comment text, or run a macro.
Why isn't Sticky Notes available on mobile devices like smartphones and tablets?
Sticky Notes is designed for Zendesk on desktop. Use a supported desktop browser to access the app.
Support and next steps
If you have finished configuring Sticky Notes, test the setup with the roles and locations your agents actually use. For future changes, keep a backup of the configuration and check the release notes for new features or behavior changes.
Useful links
Need help?
If something is not working as expected, start with Troubleshooting & FAQs. If the issue continues, send our support team the affected location/object type, the agent role, what you expected to happen, what happened instead, and a screenshot or recording if available.
Comments